Index of subjects
Build a frankenstein Stratocaster
with new, used or cannibalized Stratocaster components. For the use of a far east undrilled kit see the separate page.
After the construction guide, I go into all the parts you need and some of the issues you may stumble upon when buying on the open market.

Mounting the neck
For starters mount the tuners on the headstock. Not difficult; but there are some variations (see later).
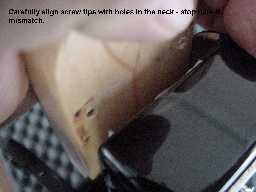
Turn the screws into the body so that they just emerge above the face of the neck cavity.
Match the 4 screws carefully against the corresponding holes in the neck
Tighten the screws going diagonally as well as round the clock, take care all screws are tightened and with the same force.
This is not necessarily the first step. You can mount the neck at a later stage and do all the bodily actions first..
Apply shielding

Shielding will prevent extraneous signals such as from TL lamps and the like to create a nasty rumble or sizzle.
Get your alu adhesive tape and apply shielding to the inside of the cavities. Make certain that the strips slightly overlap and also overlap a tiny bit to the face of the body. You can choose to not use shielding at this stage, but only do this when necesssary, i.e. when the guitar is very noisy. I always shield.
The overlaps will contact the shielding on the underside of the PG and create a nice closed Faraday cage.
I use self-adhesive alu tape as the central heating guys use, but of course you can get more expensive stuff including copperfoil from special luthiers.
Optionally you can add a screw (a spare PG screw) and a small soldering ring to the bottom of the cavity which will be an extra mass connection to the casing of one of the PU pots.
Mount the pups on the pickguard
If you have a loaded' pickguard complete with pickups, pots, switch and fully wired you can skip this step.
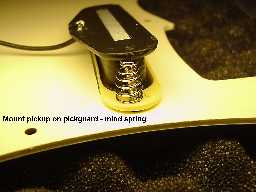
If not now mount the pickups with springs or rubbers as shown in the picture (sic!) and get your soldering iron out. The spring/bolt combination will allow you to adjust the distance of the polepieces to the strings. Start with the pups raised some 4mm above the surface of the pickguard.
Solder all connections except the leads on the jack (connector). Dont solder the jack lugs yet, you need the wires to go through a channel first.
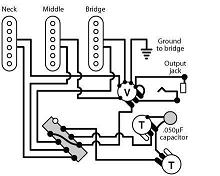
Here an example of a reasonably standard wiring drawing
Dont touch the metal part of the soldering iron with your fingers, it hurts and as a customer said "human flesh stinks when burned".
Mount the loaded pickguard on the body
Check if the holes in pickguard and body match.
I wouldn't put an 8 hole PG on an 11 hole body or vice versa. So get another PG if needed.
Now check the holes in the PG against the position of the corresponding holes in the body. With almost 100% certainty one or more holes will not match. Get your trusted sate sticks out, look for the best position of the PG with a corresponding hole and fix temporarily in place with a sate stick. Repeat with as many holes as possible.
Now mark the remaining positions on the body and drill with a 2mm drillbit.
Lead the necessary wires to jack cavity and tremspring cavity and solder the optional wire to shielding.
Fix the PG in place with 4 or 5 screws - rest will follow at the end. Don't fix all screws in case you have to step back and unscrew for some reason.
Wire up jack and mount jackplate. You will have two wires coming from the PU s, one black and one white.
The black goes to the outside of the jack connector, the white goes to the core. If in doubt check with your multimeter.
Alternatively you may have a shielded cable here. The mesh is mass or ground and the core carries the signal (also called hot).
Tremolo bridge basics
Place your 6 point bridge on the face of the body, inertia block downwards. Fix in place with the two outer screws; in practice these two are all you really need. Add the remaining four when the guitar is ready and if you want. Turn the body face down and fix the springclaw in place such that there is about 2 cm space between wood and claw - do not tighten the screws completely.
Now do some setup of the trem. I've used a method described by Dan Erlewine. to mount and simultaneously setup the tremolo. You need to make a wedge shaped wooden block, 6 cmwide, 5 cm high and tapering from about 1.8 cm to .6 cm. You may want to have a few blocks with slightly different dimensions. As soon as you have a string mounted you can set up the trem in your favourite position using the block as in the photograph, no springs yet.
You can fix the trem with the backplate flush with the body - allowing only dives - or with more space, allowing whammy up as well as down.
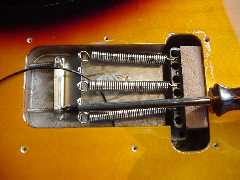
You have the springclaw already at 2.5 cm. String up completely, not yet to pitch Now add three springs as in picture (5 springs if you are into heavy gauge strings) Tune to pitch
Now haul in the springclaw using the two screws which increases the spring tension, see pic
The block will come loose when springs and strings are balanced, with the trem in your chosen position.
If you dont have or dont want to prepare such a block, no problem do the adjustment later.
Readjust springclaw when you change to different string gauge, or when you want to change the home position of the bridge!
Done sofar
Check if you screwed all screws but at this stage definitely plug the guitar in an amp and see if it produces a guitarish sound. If you only hear a terrible noise the most likely cause is that signal and mass are reversed, so check your soldering to the jack.
If you hear nothing at all there is probably a short between two wires or a soldering joint got loose.
If thats satisfactory you get to the most important point : setup.
The setup
Now we have built a guitar there is a fair chance that it is not very playable, or rather its fairly certain to be unplayable. The setup is by far the most important step in the process.
You can take a very simple, cheapo guitar and with a good setup make it a great instrument. A 10K dollar 1956 Strat with a lousy setup will just yield a lousy guitar.
Neck relief
Place a Capo on position one, just before the fret. Now depress each string (one string is enough basically) at fret 17 and measure open space between top of fret 8 and underside of string. This should be very small in the order of 0,25 mm. or less (my prefence is 0.1). If the neck is too hollow you have to adjust the trusrod. Detune your strings to take away tension. Very carefully tighten the trussrod - a quarter turn at the time to the right (clockwise) will straighten the neck. Take this very slowly.
Retune to pitch. Preferably leave it to set and check again. If the neck is too concave release the trussrod (turn anticlockwise), the strings will pull the neck into position. Some guitars have a trusrrod that can work bothways. Standard is however a trussrod that only pulls the neck straight.
Action
Action is very much determined by your own preference - more so than the other measurements.
It is measured with the capo still at fret 1 and you look at the string height between fret 17 and underside of string. A good start is 1.5 mm for E6 and slightly less for E1.
Thicker strings need more space. Take it from there.
Adjust by raising or lowering the saddles using the small Allen (typically 1 or 1.5mm) hex screws.
Here you may hit a serious problem if the neck tilt w.r.t. the body is wrong - see below.
Neck tilt or shim
If you find that you cannot reduce action because your saddles are at their lowest posible point its time for a SHIM.
Shimming means that you take a small piece of plastic (or whatever material) about 0.25 or 0.45 mm thick and about 5cm by 1 cm, and place it in the neck pocket before the screws on the closed side (away from the headstock). This will change the action, normally enough to be allow adjusting the saddles again. In general one 0.45mm shim will do the job.
If you find that the saddles are in their highest position with strings to low or even touching the neck, place a shim at the other side of the neckpocket.
Obviously you will have to unscrew the neck for this operation.
Pickup to string distance
With the bolts either side of the pickup adjust the distance between polepiece and string to around 2.3 mm whilst depressing the string at the last fret.
For the higher strings take a bit less more like 2.1 mm. Experiment, but as you take a smaller measure check sound and sustain as the magnets can mute strings if too close. Too far will of course yield a lower output signal..
Nut adjustments
Depress each string right over the third fret. There should be a bit of distance - light shines thru - between fret 1 and the underside of each string. If the string is touching fret 1, your nut slots may be too low and you may need to shim the nut or get a new one. If its much more you will notice playing in the open and first positions is painful on the old fingertips. You can mightely improve this by filing the nutslots down - carefully!
The slots for the wound strings should be rounded, not deeper than half the string, the slots for higher strings can be square but not too deep!
Tremolo bridge adjustment
You may want to change the position (tilt) of the tremolo bridge. This is done with the two screws holding the sprinclaw in the back cavity.
Intonation
The mystery of intonation
The problem: if your intonation is not good, you will find that you can tune the guitar reasonably well for example for open chords but then playing in higher positions will sound awful. Familiar?
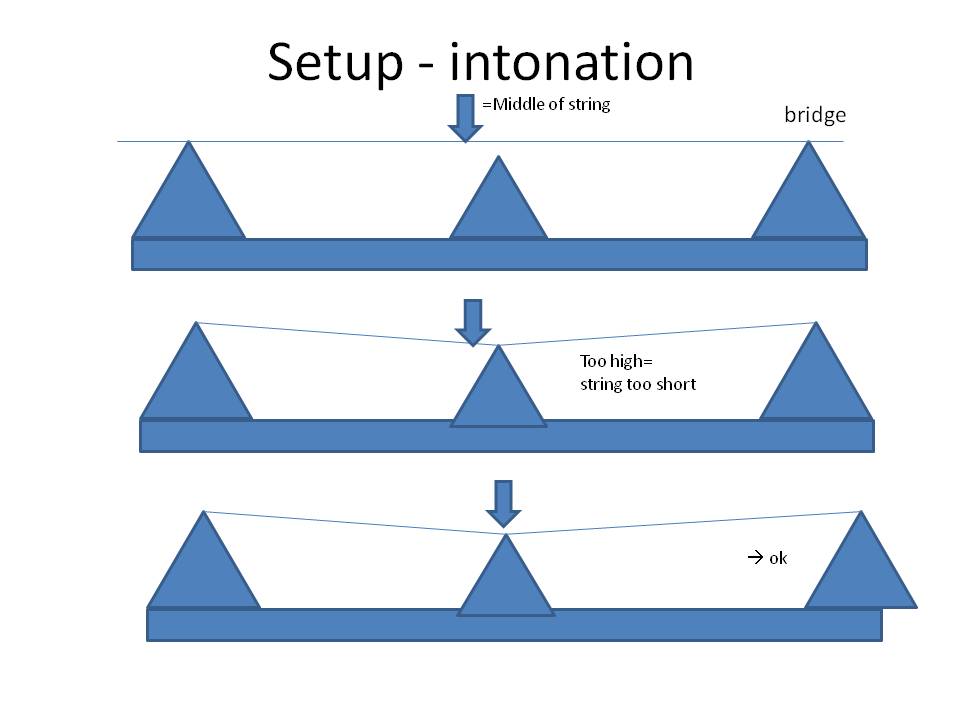
The illustration above shows in schematic form what its all about. The drawing represents the E1 string, which basically represents the Strat scale of 648mm, and thats what you set for starters. The principle for other guitars is the same, but the scale will be different for a bass, or a Les Paul.
Even if you accurately adjust your high E string to 648mm than still the properties of the string can cause that the wave form of the string doesnt match the fret positions, with best reference to fret 12 ( octave). This is caused by the material of the string, the age of the string, the gauge (.009 will be different from .013!), accumulated dirt etc.
As in the pic above it can therefore occur that when depressed on fret 12 the note is slightly higher than the open string or the flageolet harmonic. You can see that in this case when the note is sharp, this is caused by the string being a bit too short between fret 12 and the bridge. You have to make that part a bit longer, by moving the saddle to the back. You then move the acoustic midpoint of the string to its right position above the 12th fret.
Intonation is by far the most important step in the setup, you have to do this. Worse, you have to do this each time you change any of the above settings!
This is best done with a good electronic tuner, possibly a stroboscopic one if you have USD 300 or so to spare.
Start by ensuring E1 scale is 648mm, and from there the other strings a tiny bit more (about the width of string itself). This will be almost right, but not good enough.
Now for each string starting with E1 do the following:
Check the harmonic (flageolet) at fret 12 with the note when depressing the string at fret 12.
They must be the same.
If not adjust by moving the saddles for- or backward.
If the depressed note is sharp, increase the stringlength (see the schematic above!); move the saddel to the back.
Using an undrilled, unpainted Strat kit
Workshop participants frequently ask if they can bring a complete kit, so they can go home with a ready made guitar of their own.
So I decided to try out a kit - the cheapest i could find, before risking my workshops.
See separate page how to go about that!
The parts shoppinglist for a Strat:
Time
If you don't have to or don't want to do cosmetic restauration work like filling up old screw holes or do complex routing, you can put a Strat together and set it up in four hours or less. Getting all the right parts at the right price may take you a few months though!
Tools
You need a certain minimum set of tools. Wrenches, soldering iron, measuring tools for setup, files and so on. Most books give an overview of tools you need. A workplace where you can leave your work in progress for a few days - undisturbed by kids, wife or cleaning lady. Get some plastic containers like the Chinese takeaway uses to keep little parts, screws while you're at it. You will drop a tiny screw at some stage and it will be lost forever.
The Stratocaster shoppinglist
A typical package for a fairly standard Strat must have the components in the picture and more precisely in the list below. You can combine parts from genuine Fenders such as Squier, Mexican, USA without major problems. So a good Squier body with a nice USA made neck will make a very good instrument. Many clone stuff may fit as well, but be prepared to do some adjustment. Only pickguards and tuners normally require some holes to be drilled and filled.
Your shoppinglist would look something like this:
Neck and body
Pickguard with normally 11 screws
Pickups with mounting material
Tuners with 6, 12 or zero screws depending on brand
Tremolo set with 6 screws, plus two for springclaw
Neckplate with 4 screws
Jackplate with jack receptacle with 2 screws
Strapholders with 2 screws
Stringtree (one or two) with 1 screw each
Backplate with 6 screws (if you really want one)
Alu or copper shielding tape with 1 optional screw
What you must know about Strat components
Especially if you try to put together your own set, there are some pitfalls coming your way with each component. But that makes life interesting doesn't it?
Neck
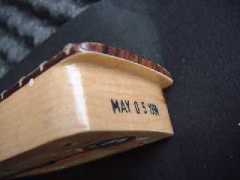
Necks come in a number of varieties. The main things to watch are: the serial number and logo plus shape of headstock signifying origin and age (this will affect the price!). Beware of fake Fender decals.
Fretboard can be maple or rosewood. Rosewood is said to cause a more 'bluesy' tone, and maple a 'sharper'.
Wood, normally maple with a skunk stripe present yes or no (walnut inlay at the back enabling access to trussrod during building); 21 or 22 frets. See photo for a 22 fret example, clearly recognizable. Fits standard Strat body no prob.
Neck shape - if you are critical or advanced, C-shape, V-shape etc.
Neck radius (i.e. the fretboard's curve). Dont bother for now.
Scale
The standard scale length for Strats and Teles is 648mm, which is the stringlength between the nut and saddle points of contact.
For E1 this is the startpoint and thus fret 12 should be very close to the middle of this. Scale lengths for the thicker strings are a tiny bit longer - roughly increment for each string is its diameter. This a good initial way of setting rough intonation. To fine adjust intonation needs a bit more attention, a lot of time and a good electronic tuner - will be dealt with below.
There are short scale instruments with shorter uh. scales (like the old Musicmaster)
Body
Things to watch out for are:
Age
Paint check for original or refinished (should not be done to an old body, criminal).
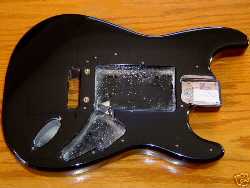
Routes HSS, SSS, Bathtub (see the black one below) or modified. Bathtub is ugly, but the advantage is that it will accommodate any pup configuration.
Bridge type and width (there are two widths, see tremolo). Type can be two point Floyd Rose or Kahler versus standard six point.
Wood type (mostly alder) - requires some specialist knowledge, difficult to see if the body is sprayed.
Check for laminated wood, as used in some furniture. Good for experimenting, but should come very cheap.
Bodies can be from one piece of wood, or two or three glued together. The single piece body is the best and most expensive, but there is nothing wrong with a two or three piece body and a lot more affordable. Plywood bodies should be dirt cheap; ok for some experimentation.
The body in the picture above is a bathtub. Also its drilled for a two point bridge like Floyd Rose or Kahler. Better start with the standard 6 screw vintage type..
Regretfully bodies are not always clearly marked Fender, you have to trust the seller or decline - or get down the price.
Pickguards
When buying pickguards watch the correct Trem (vintage or two point Kahler) fit and PU configuration; SSS, HSS etc as well as the right number of screw holes. Most common are 8 (vintage) and 11 hole (regular).
If you buy a pickguard off the market separately from the body it is absolutely guaranteed that one or more screw holes will NOT match those in the body. Not too much of a problem if you are prepared to drill a few holes AND fill the unused holes (cocktail stickers and sate sticks make great prefab dowls). Another attribute of PGs is the number of layers, study those on Ebay. You see single layer, BWB, WBW etc.
Pickups
Also referred to as 'pups' , not cute little doggies.
Coils. The specific Fender sound has to do with the single coil pickups. As single coil can be noisy, the humbucker PU's were designed. Effectively these have two coils switched out of phase, which apart from a totally different sound also eliminates hum.
Another variety in the single coil arena are PU's with humcancelling, effectively humbuckers but the second coil doesn't contribute to the output.
In the book I will only deal with basic single coils in a SSS configuration - three of those.
Here are a few important brands with their single coil product which provide very good alternatives to the original Fender PU's.
-
Van Zandt - Vintage Plus
-
Seymour Duncan - California 50's
-
Fralin - Vintage Hot
-
DiMarzio - Virtual Vintage
-
Nordstrand NVS - standard Rio Grande - MidBottom
-
Rio Grande - MidBottom
-
Kinman - Traditional>
-
Suhr - V60
If you're in an experimental mood and have the cash, you can experiment mixes of these.
Magnets. There are several types of magnets, a mystery for many is the discussion around alnico (aluminum, nickel, cobalt) and ceramic magnets - and several more! Alnico is believed in general to have the better sound and these pups are in general more expensive.
About Strat electronics and wiring
I add one extra ground (mass) wire from the volume pot housing to the shielding of the PU cavity, this is not in the drawing but is easily added, similar to the one called 'ground to bridge', you could call it 'ground to shield'. It improves to total shielding effect.
If you don't have a loaded pickguard, mount all the components on your pickguard, turn it upside down and get your soldering iron out. Cut all wires to the desired length, strip all wires and apply solder to the stripped part. Apply a thin layer of solder to all other contact points like lugs of the pots. This pre-soldering ensures a quick connection.
This set of pots and a capacitor is referred to as 'the guitar electronics' . Actually these circuits are in fact passive (there are no active elements such as transistors or integrated circuits), so electronics is a bit of an overstatement.
Things get more electronic when preamps and the like are added. Currently thats outside the scope of this edition, but I'm in the process of writing a another book on electronics and mods (also some content of that book will on this site).
This drawing is a basic schematic, most Strat-alikes conform more or less to this layout.
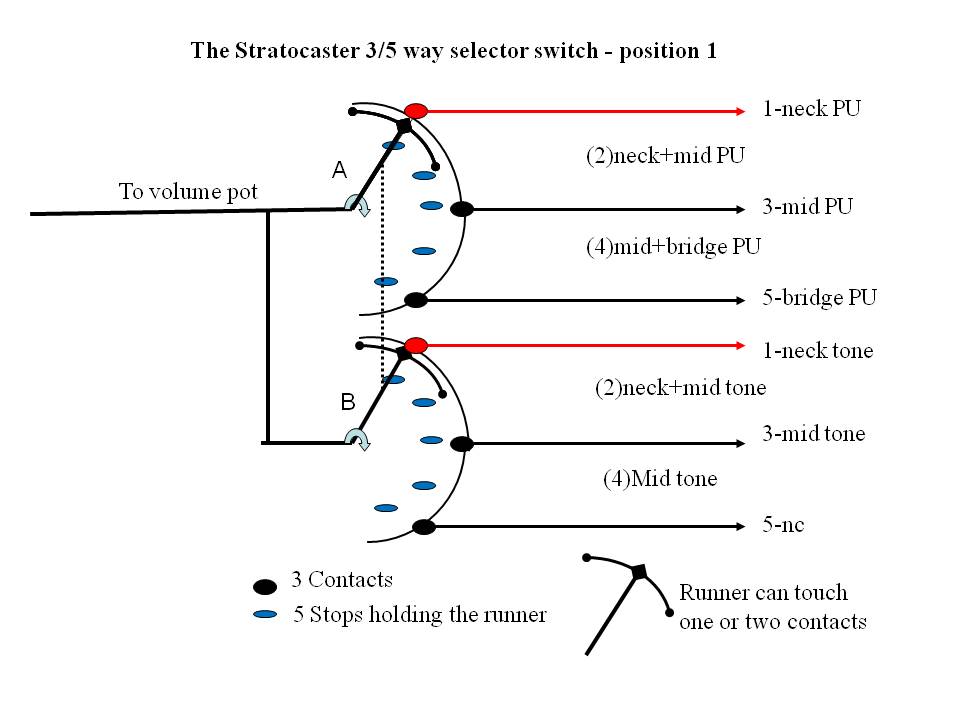
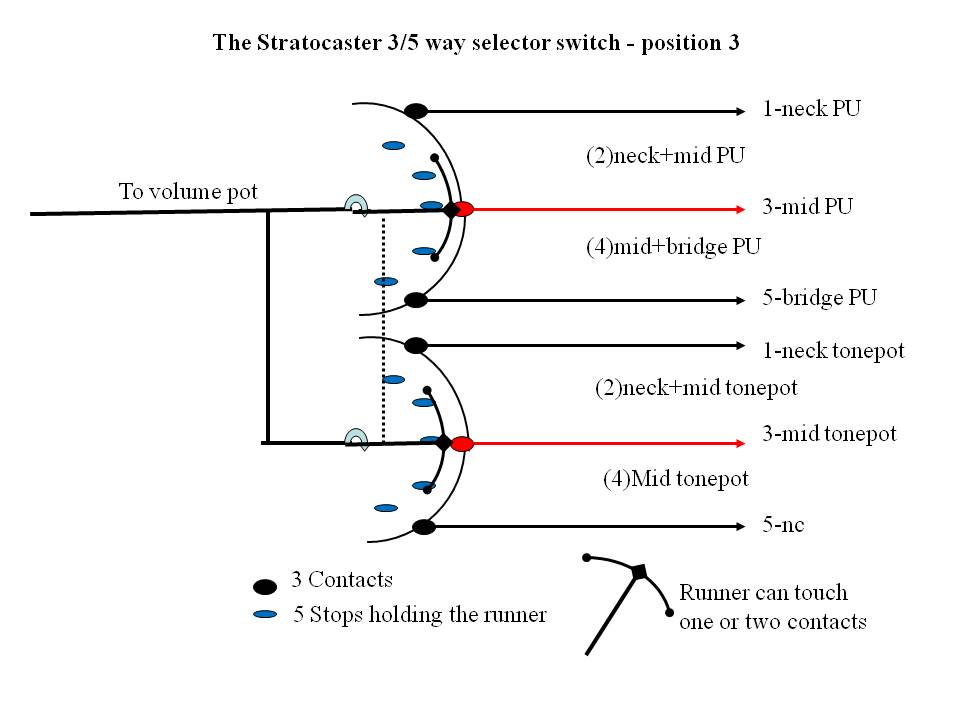
The Strat 5-way switch
Most people only have a vague idea how that PU switch on the Strat works, let alone how it must be connected if you must replace or modify something.
My book explains more about it, but here are some crucial details as well as a series of pictures that show how the switch operates.
Basically on the Strat we have a double rotary switch with three contacts in and one out. - The two switches are on one axle and thus operate in perfect unison. The modern switches dont look this way, but behave the same.
- The runner is broad enough to touch two contacts when placed in the middle (this was how the early players tricked the two additional positions with a 3-way switch.)
- So we have 3-way switches with 2 additional stops in between, yielding 5 possibilities
In the Strat the pups are connected to one switch, the tone pots to the other and the two outputs are bridged and go to the volume pot.
On http://www.youtube.com/lambertusjan i have publsihed all 5 pictures as a video clip, which shows the working quite nicely.
Here I show the first 3 positions, which should suffice to clarify the operation.
The red lines are the active connections in that position. Have a look:
position 1
position 3
position 2

Note that there are more switches:
MEGASWITCH, basically a real 5 way switch (no aritificial stops_)
SUPERSWITCH: this is a nice beastie if you like soldering. Its a 4 layer , 5way switch. So you can imagine there's a confusing amount of configuration possiblilities.
S1 SWITCH: is a pushpull pot with built onto it two dpdt switches.. You see this one used in combination with the superswitch. I will follow these switches up on the electronics pages.
Tuners, machines, whatever.
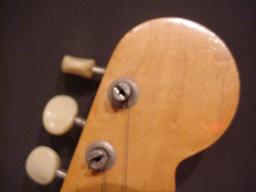
See photograph above with a very vintage (1963 Musicmaster) example of slotted tuners with non-threaded bushings. By the way, the Musicmaster is a wonderful guitar with a great sound from its single PU and mahogany body. Vintage still affordable - not for long though.
See the Precision Bass page how to set up strings in slotted tuners. The PBass pegs are larger, but the principle is the same
Tuners, machines, machine heads, pegs and more aliases are used. They come in a number of variations. With bushings that have to fit in the headstock, with threaded bushings that are screwed on the machine. Then there are vintage slotted tuners and new models with a hole thru the peg.
Tremolo and bridge
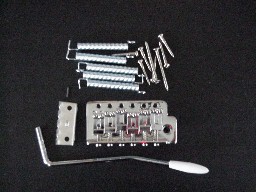
There are 2 point pivot models like Floyd Rose and the hardtail (only bridge, no tremolo).
Floyd Rose is somewhat more complex, the hardtail bridge somewhat less.
The tremolo parts are - bridge with saddles, block and baseplate with 6 screws - the whammy bar - spring claw with 2 screws - and 5 springs. The springs act as a counterbalance for the strings and determine the tilt of the tremolo bridge.
The neckplate
Holds the neck - body connection. Most common is the variant with 4 screws.
In the seventies Fender experimented some time with a 3-screw connection and a triamgular neckplate, which is not very popular. Recently (Anniversery models) there are neckplates with 4 screws but asymmetric. The Precision Lyte models have a similar genetic quirk.
The 4-screw type fit Stratocaster, Telecaster and Precision Bass.
Vintage neckplates may hold a serial number - and will cost loads if real. Many fakes around, easy to make. Serial numbers moved to the headstock lateron.
There is also a black plastic neckplate that fits under the metal one. Thats purely cosmetic, no function.
The rest
Stringguides or tree. Required for the E1 and B2 strings to force the correct angle of the string over the nut. Sometimes also for G3 and D4.
Strapholders.
GUITARS RECYCLED - CONTACT
Use this link to send me a question or order the Stratocaster book: