Making a Telecaster Body
Here is the story of taking a slab of wood and making a Telecaster body out of it.
You can use nice woods like mahogany, or just re-use an old table, barnwood or whatever.
This project goes beyond building a guitar with cannibalized components, its harder, you need more skills and more tools.
However, it is a very satisfying adventure to undertake if you are brave.
IMPORTANT:
FIRST make a template on basis of an existing body (of your choice), and SECOND use that template to route out a body from piece of wood.
You can of course buy templates, but this will learn you how to make a template first and also you could see how to make your own templates with possibly your own design.
You will notice that i use two bodyblanks below. Simply because I'm lazy and didnt make all the necessary pics with the mahogany body, so I added pics with the old oak bodyblank! The same difference.
NEW: Making a Telecaster (or other) neck
At the end of this page we continue with a similar process for a neck., starting with making a template.
Necks are somewhat more complicated than bodies, so follow me on this path of adventure! .
At the end we will have created a COMPLETE guitar with the woods of your own choice.

What You Really Need, Tools and Such
No fun really to go to the bank and invest a few grand in a full fledged woodworking workshop - thats a different business model .
If you want to go professional with this (not impossible) then you need a fully equipped workshop with many more bells and whistles.
The bare minimum requirements for us are :
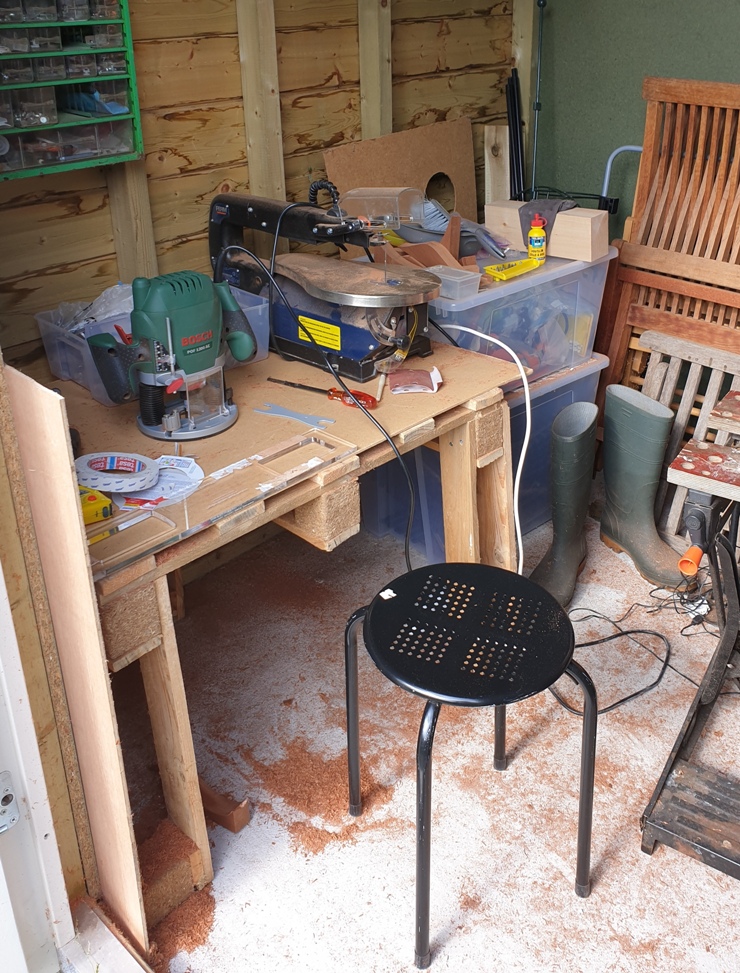
a. a workplace where you can create a lot of wood dust and a good hoover to get rid of it. This is not something you can do in the average living room. I had the corner of the shed so i have to make do with that. In the pic you see a bit of the wooddust generated - it gets much worse. I made a nice sturdy working table out of scrapped pallets - but everybody can do his own.
b. safety spectacles, to avoid dust getting into your eyes but also to avoid injury in case some larger piece starts to fly around. It happens.
c. a wood dusk mask. Wood particles are not healthy, some woods are definitely unhealthy.
d. good leather (garden) gloves. Router bits are darn sharp and when in use can get darn hot. Use gloves when handling.
e. good overhead light to see what you are doing
f. Toprouter and a small assortment of top bearing and bottom bearing router bits, and a round off router bit to round of the edges. You can go all the way, but mine was 75 euros and works quite well.
Be very careful with using the toprouter, its a powertool, with very high revs and very sharp bits.; take it very very seriously.
If you have no experience you must do some excercising on a junk piece of wood, a router at 1200rpm has a life of its own if you do something fumny. This is not a recommendation, its a must.
g. Vices, clamps or anything to fix your work in place
h. small first aid kit. Sooner or later you will take some skin away, guaranteed.
i. set of common tools, screwdrivers, pliers etc.
j. a long 15 cm length , 7mm wood drill for the wiring channels and a long large hole 15mm wood drill for the jack position.
k. diamond files #400 and #1000 to sharpen your router bits.
Routerbits , the minimum
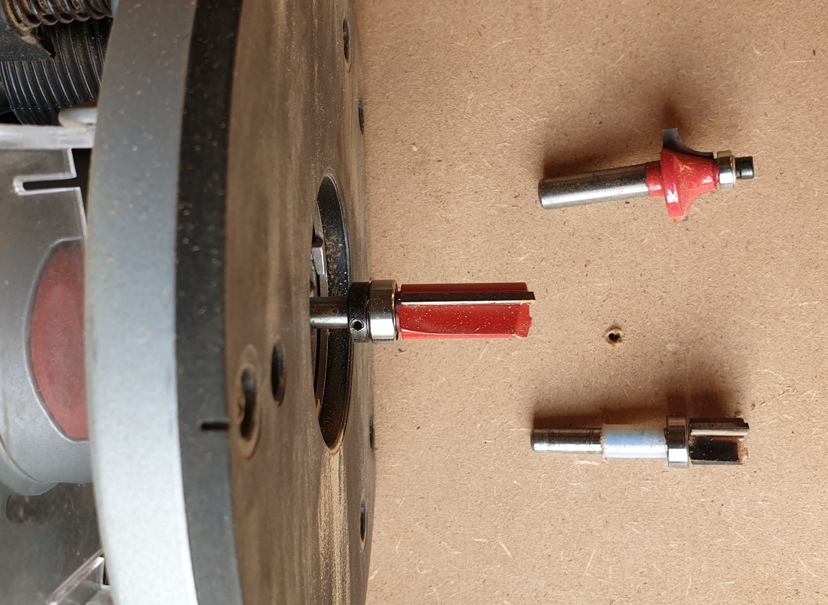
You need at least the four bits in the two pictures here. More is ok, but you can get around with these four.
1. the small one to make the first groove, for the body outline as well as the first route for the cavities. A top bearing bit.
2a i use the same small one to deepen the cavities to their required depth.
2. the longer one i use to completely route the body out of the blank after the initial groove. Top bearing.
3. the round off bit to, well, round off the edges of the body. This is a bottom bearing bit.
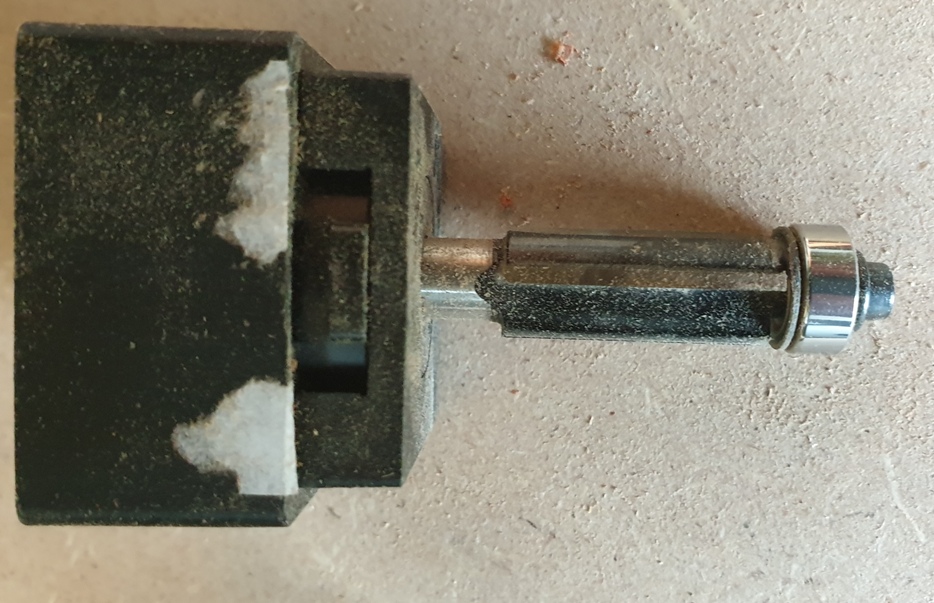
4. Separate pic, the bottom bearing bit is the one we use to make templates. Basically you make a copy of an existing body using 6mm MDF or plywood.
Making Templates
We will be making MDF (or equivalent) templates by effectively copying the shape of a body, in this case a fairly standard Tele.
You can buy templates for a lot of money, but its not difficult to make them and save the money.
Having (a set of) templates enables you to repeat the routing procedure with new bodyblanks, almost a production line.
- Take a standard Telecaster body. I assume you have at least one if you have reached this stage of madness.
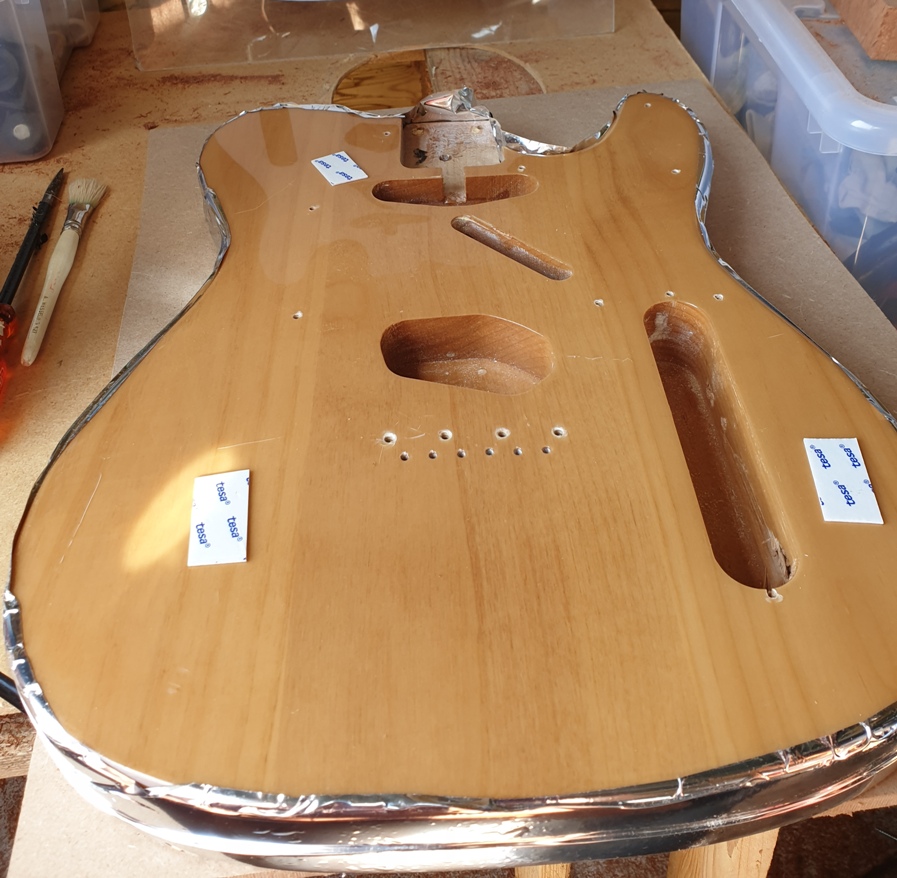
- Protect the outside of your original body with alu foil, this is where the ball bearing bit's bottom bearing will ride.
- Take a piece of MDF (6mm) and attach it to the body using two sided tape ( use only small pieces!). Best is to first use the body upside down.
- Take the longer bottom bearing router bit and place it in your top router such that the bearing rides well below the depth of your MDF template.
- Make certain that where the neck cavity is the bearing still rides against the wood - otherwise the bit bites into your precious body as well as the template in no time. Blowout.
In the picture below that went out of control and the first template misses out in the neck cavity area, its still usable though, the cavities are ok. I made another one, and use this one for the cavities.
A lot of fine dust; MDF is quite dustprone. Dont inhale that.
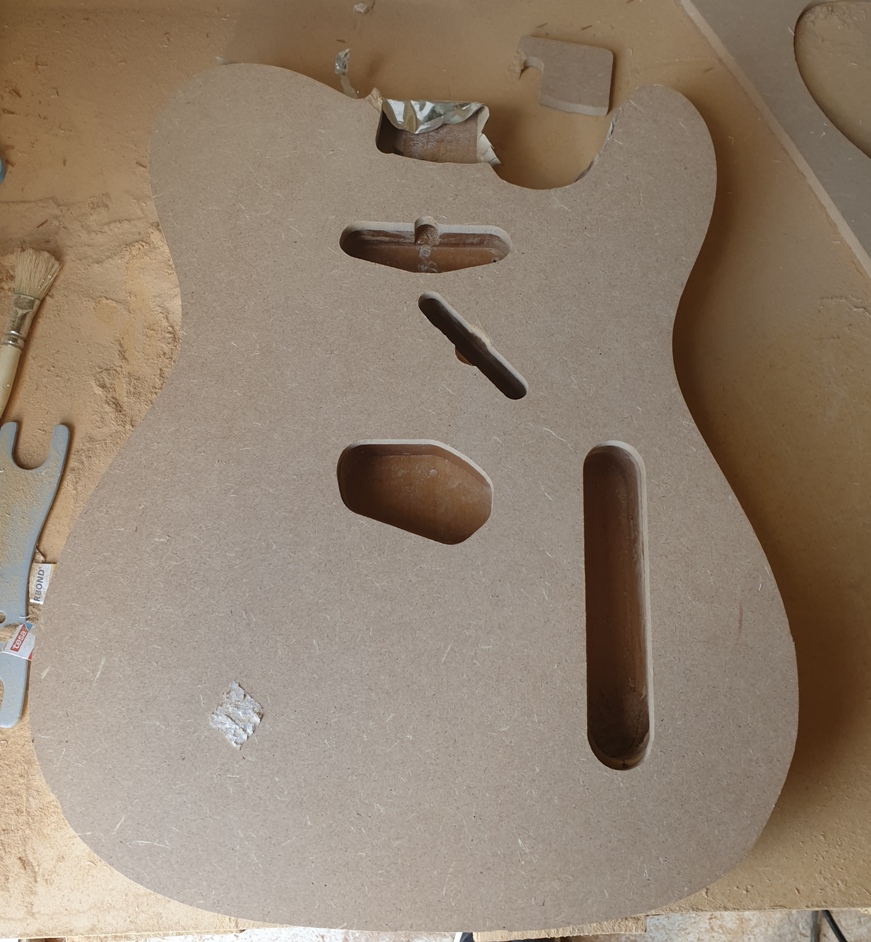
A
Turn the original body over now and place the template on the front. Mark de places where the cavities are located (not the neck cavity, that will be different).
Drill a hole in the template at the places marked (dont drill in your original body) and with the same bottom bearing bit route out the pup cavities and the controlplate cavity, as wel as the narrow cavity for the wiring.. You now have a MDF template of the body with all the cavities.
While you are on it mark the position for the string thru holes, a thin screw driver or other sharp implement lets you mark this easily when the templat is still attached to the body.
Done - you now have a template (or two) that can be used time and time again to make Telecaster bodies from all kinds of wood blanks you can lay your hands on.
Template for the neckpocket
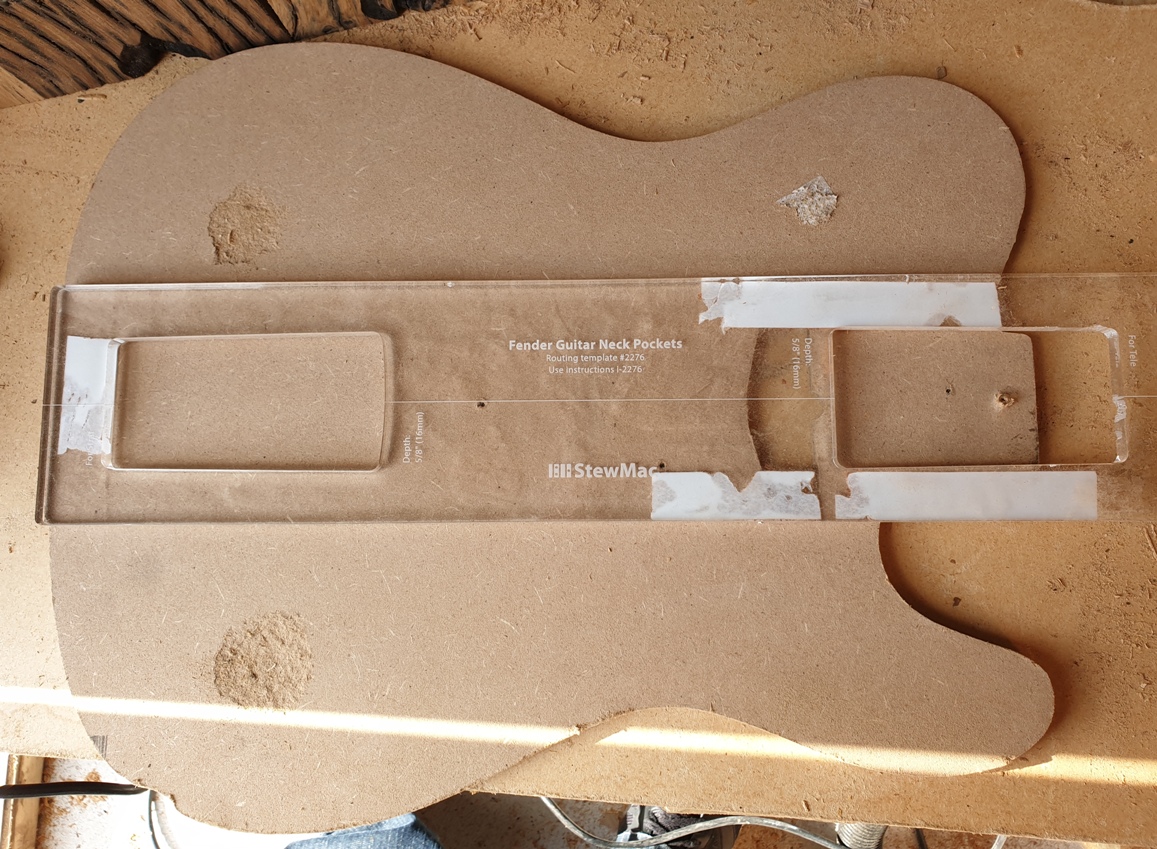
Strongly recommend you obtain a template for the neck cavity from Stewmac; its made out of thick perspex and has both Tele and Strat neck formats (there is a difference!). It accurately positions the cavity for Fender bodies., wrt to the standard scale.
Its a bit of an investment but well worth it.
Check out their instruction video!
The Bodyblank - slab of wood requirement:
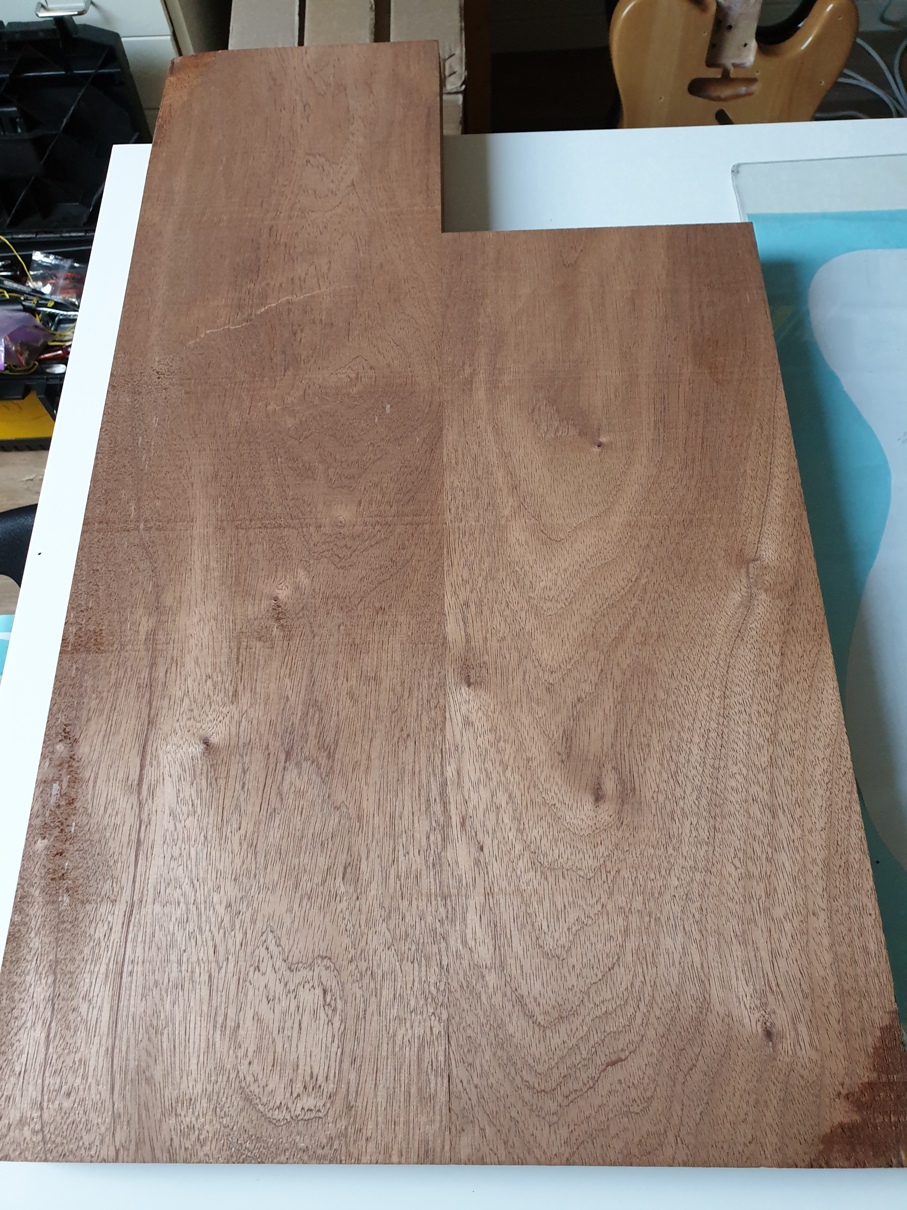
It will be clear that you need a bit of wood to create your body from; here mahogany.
For a Telecaster the dimensions are roughly 40 by 40 cms, and at least 4cm thick, preferably 4,5cm.
Y'all across the pond work out or search the dimensions in imperials like inches and feet, yards, miles and such.
The example i use here is two piece mahogany that i could lay my hands on. It could yield a Strat, but i decided only to do a Telecaster body. Single pieces are there but will be terribly expensive.
A Tele is easiest for a first project, as it is not a sculpted body. But alternatively you can make a flat (not sculpted stratocaster) to keep things simple.
Keep your eyes open for wood of sufficient thickness, although thinner might do as well but then you probably have to add a top or bottom layer using nice looking plywood or doorskin. Basically once you have your templates you can do anything.
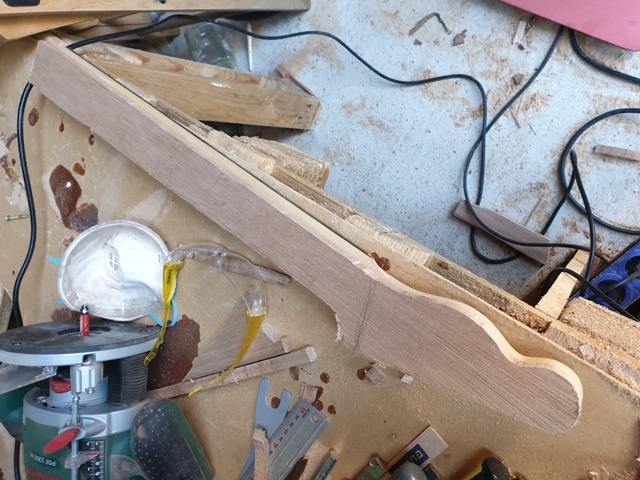
I found a firm not to far away (there are more) who import wood from old barns and railwaywagons, in order to produce tables and the like. They are usually willing to glue some (two or three) pieces together, often enough in lengths for 4 bodies.. See example below.
The environent will be grateful if you re-use old wood; and it looks good too.
Routing the outline - set router bit depth correctly
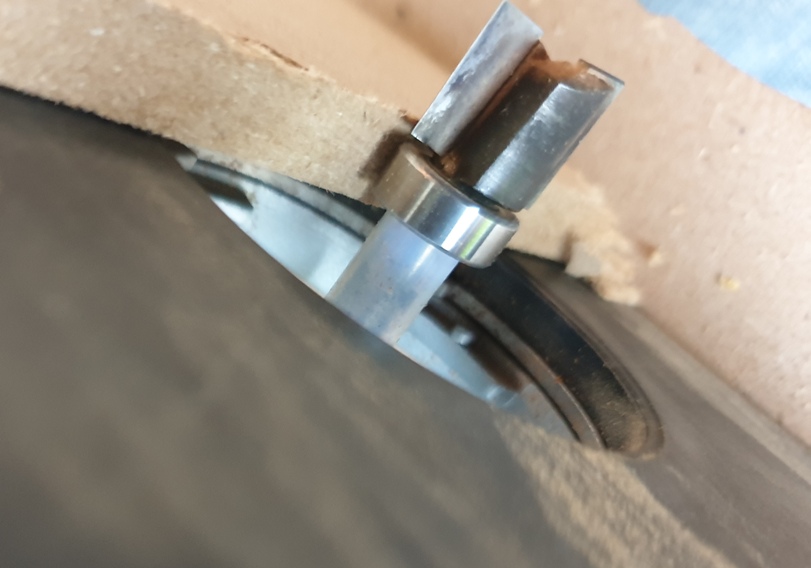
Carefully set the depth of the bit such that the bearing rides on the side of template in order to make the first outline groove,
The first groove is not to deep, which allows better control of the router, After all, we are amateurs no?
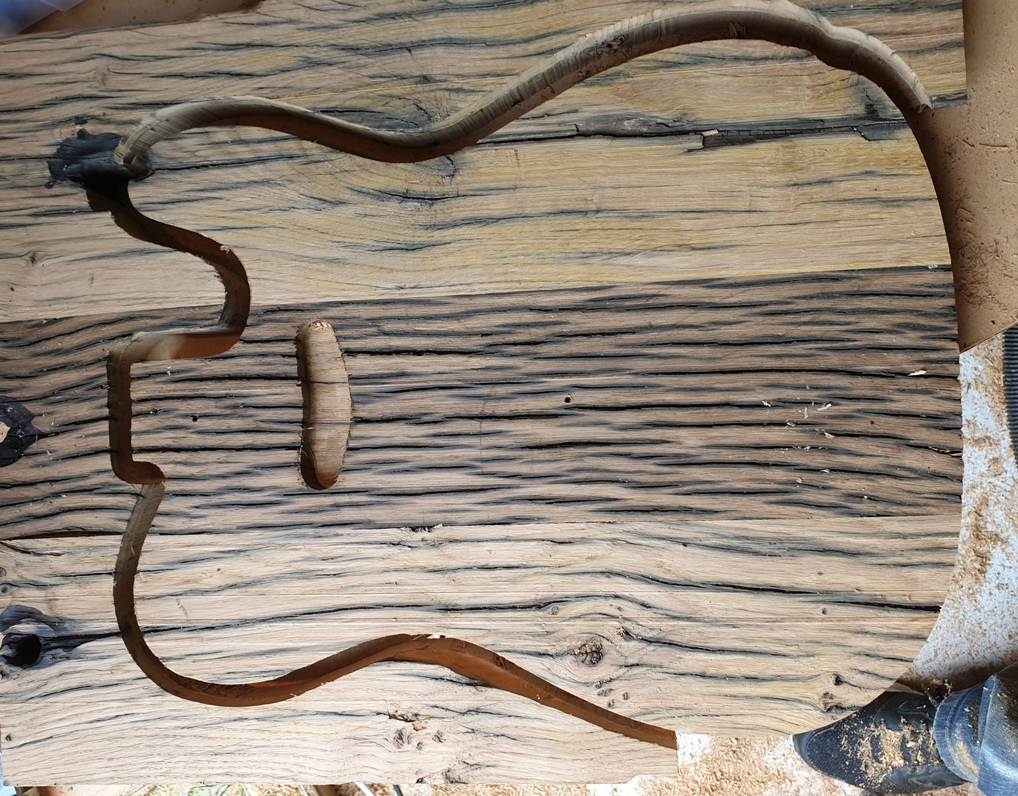
Routing the outline of the Tele body, step one:

- Take the bodyblank (in this example the old oak) and place it one your workbench.
- Place a template on it as you like, possibly align the middle with the line where the pieces are glued.
- Fix the template on the bodyblank with two screws located where they dont hurt your end product. Therefore have two templates, one just the outline and the other with the cavities.
- Make certain with clamps or whatever, that the setup cannot move horizontally . At this stage your routerbit will not go thru the body so vertically you are ok.
- I find it easy (but opinions may differ) to start the outline with a relatively shallow routerbit. A top bearing bit.
- Mount the bit in the router and adjust the depth such that the bearing will ride on the template (see picture). Make certain the bearing cannot ride upwards with a heatresistant plastic or metal sleeve.
- Now the moment of truth if you do this for the first time. It makes life easy to drill a hole close to the edge of the template, but some distance (1 cm) away.
- Put on your facial protections.
- Place the routerbit in the hole and start the router HOLD IT FIRM AND LEVEL WITH THE TEMPLATE.
- Move it slowly towards the edge of template and than move it along side the template, following the curvature with the position of the router.. I stop after each 10 cms or so to let the bit cool down. It wil get HOT.
- Continue the process until you have a groove along the whole template.
By now you will be ankle deep in saw dust, so take out the hoover and clean up for the next step.
Over to the next step of the routing exercise.
Step two of the routing process, freeing the body from the slab
To completely detach the body from the slab , do the following.
- take off the template. Not needed at this stage. The top bearing of the router bit will / must ride on the wall of the groove you just made. Make sure it does
- Select a top bearing router bit that is just long enough to reach the bottom of the slab.; with the top bearing against the wall. In the picture the longest. I you dont have that use a small one but repeat layer by layer.
- Select a convenient entry point to start routing (here at the end of the body, or the existing entry point).
- Fix the slab in place on your bench so that it cannot move horizontally nor vertically, and place such that your router bit tip hits air if it sticks out below. All depends on your setup, mine is fairly primitive.
- Put on your protective stuff again!
- Place the router in or against the entry point and start it.
- Press lightely to the wall of your existing groove and move laterally. Stop each 10cm or so to check, let it cool down and check if bit is still tight in the router and correctly positioned.
This stage removes more wood, and therefore the router makes more noise and gets hotter. Stop and check frequently.
The wood particles will clog in the channel, and you may see it start smoking. Stop and avoid a fire starting.
BE CAREFUL, ROUTER RUNS HIGH SPEED, THE BIT IS SHARP AND GETS VERY HOT.
- OK, so far so good. Take out the b>ody and admire your work. If its your firstborn it has taken you a few hours of hard work!!
Take a moment to feel good about it.
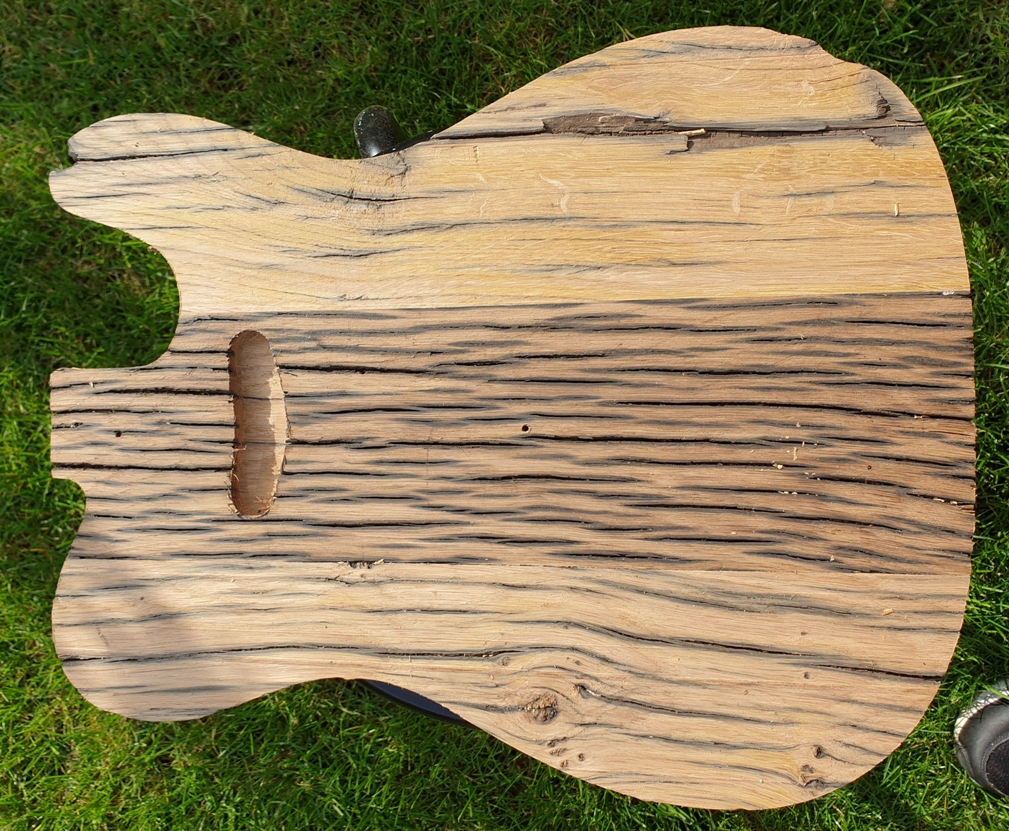
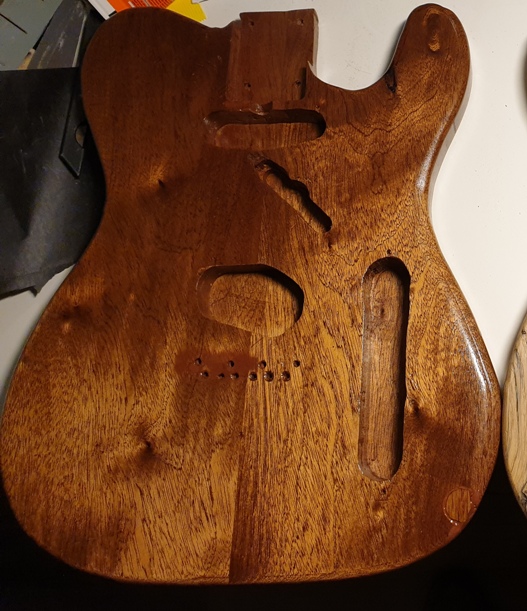
Here is your first, still raw body. The more than 100 year old distressed wood will need extra work on the surface, possibly with 2 component resin. I will not cap it with another layer because i like the appearence. But thats another chapter.
Next step is to route out the cavities , drill channels and mount hardware, neck to see if everything works as it should.
For that purpose i will now go back to the mahogany body.
1. Neck cavity / pocket
Here we use only the smaller bit, as we need to rout out the cavities layer by layer.
Get the neck cavity template from stewmac and mount it on the body with double sided tape, aligning carefully with the middle of the body.
Route out a first layer using the template, take off the template and start routing the neck pocket accurately to actual required depth
As with the body outline, after the first layer you can do without template as the bearing will ride against de body wall itself. Take out small layers in several runs..
Best go to Stewmac.com and see the video clip they made of this, that makes it abundantly clear.
2. Remaining cavities
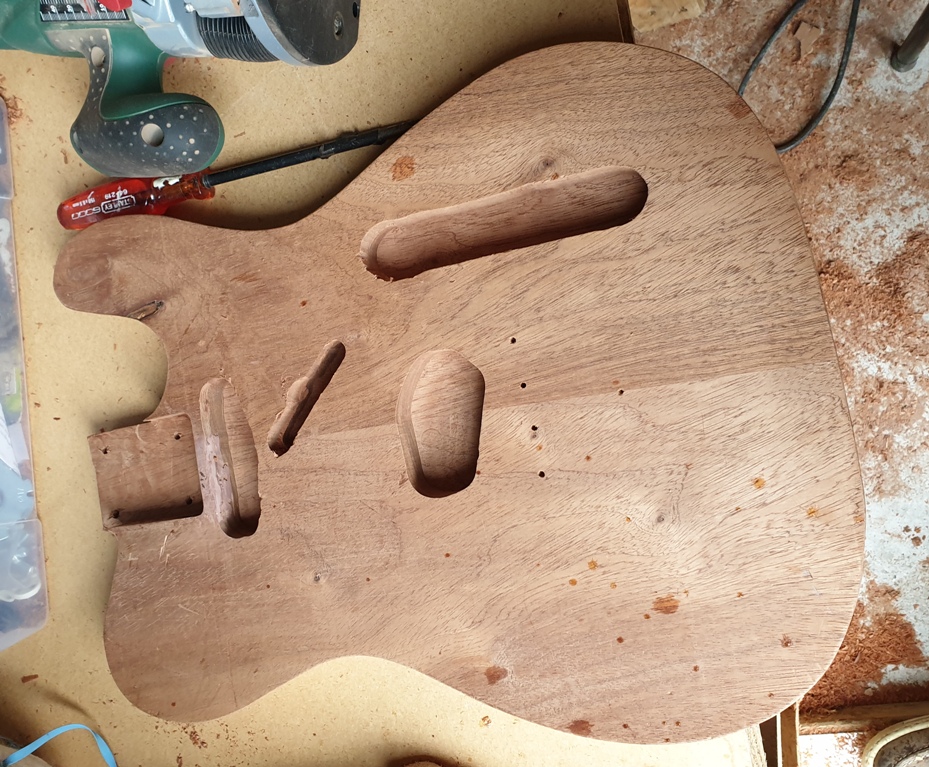
Note: switched back to the mahogany body, the old oak requires much more work. This one can now almost be transformed into a guitar.
Place the template with the guides for the cavities on the body, use double sided tape (i dont like that, residue annoyng to remove) or use clamps.
Route out the cavities to an initial depth..
Next take of the template and start routing the cavities to their required depth. Ensuring that bearing rides against the wall of the cavities you just made.
All the dimensions are on the web, but you can also measure your original body cavities. The control plate cavity is deeper as it must house the switch
It started raining !
Sharpening the router bits
By now your bits may be a bit dull. If the toprouter starts shaking and it gets difficult to push through the wood its time for sharpening.
There are good clips on Youtube (search sharpening router bits), they show the process
You need one or two diamond coated flat files. ( if you cant find them search Aliexpress)
A Good Time to Round off the edges
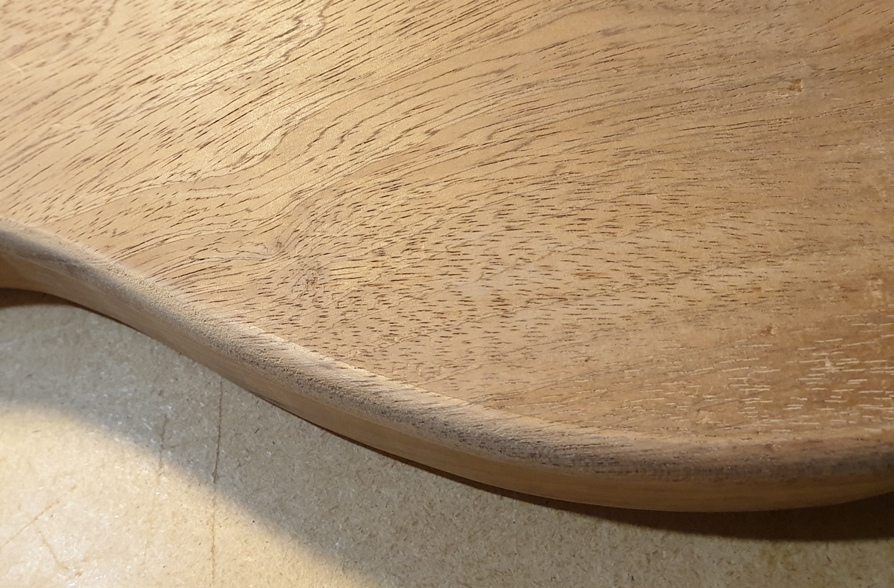
Now place the round off bit into the router and do the edges. Be careful to NOT place the bit too low, you will end up with an ugly stripe. Test on a piece of scrap wood - by now you have enough of that.
The pic shows the effect you want.
Now do a test build to see if everything fits and is straight and position the neck.
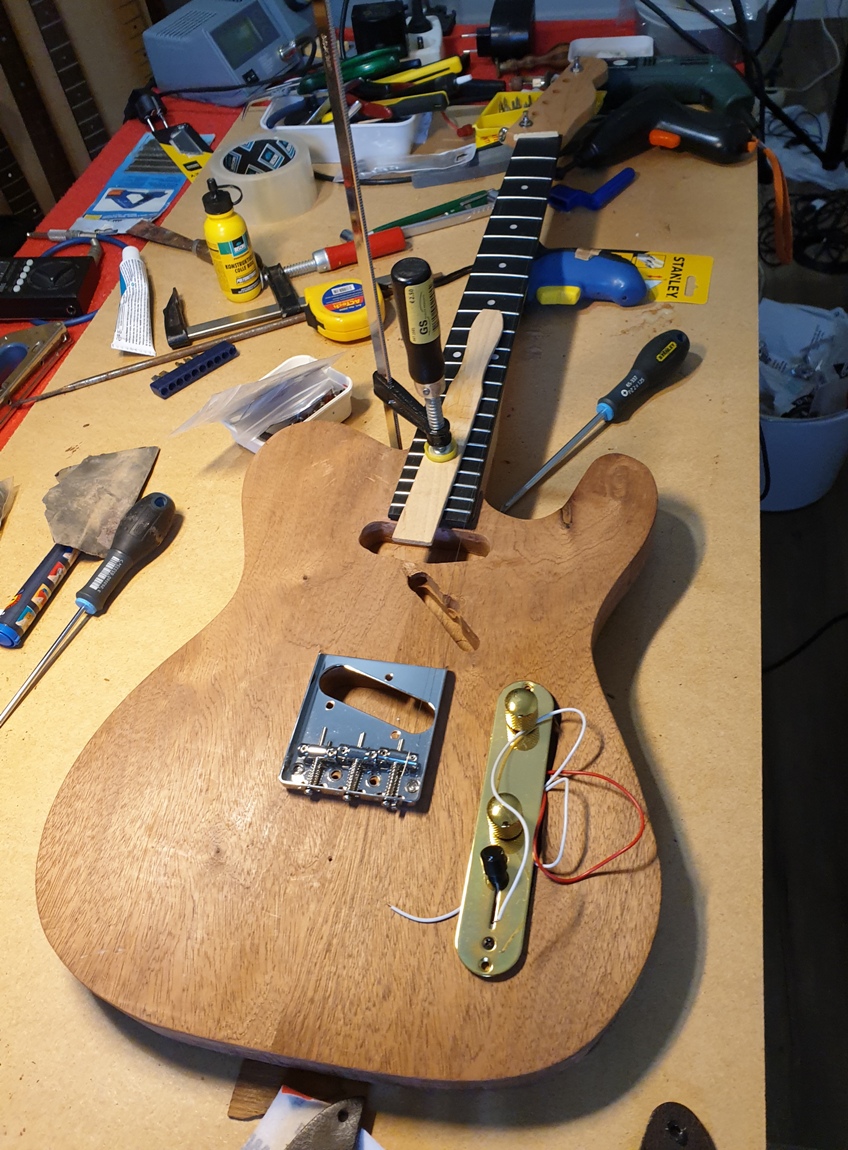
Remaning are the followng actions
0. Select the hardware you want to use. Bridge, pups, controlplate etc.
1. drill the channels between the various cavities, which is where the wires live.
You need long drillbits for this, 15 or 20 cm length.2. drill the hole where the jack is going to sit and the channel towards the controlpanel cavity. Careful, this is a big hole requring a large wood drill bit.
3. drill the holes where the bridge is going sit, as well as the six holes for the thru body string system. This is rather critical, copy the bridge position from the body you used as master. Several ways to do that. Mount the bridge.
4. at the back make the thru body holes a bit larger to accept the string ferrules and carefully with a small hammer tick them in.
5. copy the position for the neck plate screws from the master body onto the templace (use a nail, a small drill whatever). Drill the holes for the neckplate (3mm)
6. now follow the same procedure as with the undrilled strat kit. In short, mount the neckplate with 4 screws, place the neck and keep in place with a clamp (protecting the neck with two pieces of wood). Mount one or two strings. Make certain that strings run parallel to the fretboard, i.e. neck sits stratght. Now turn in the neckplate screws so they bite firmly in the neck. You now have the neck marked in the right place.
7. drill the holes in the neck, 2mm, 1,5 cm deep. Fix the neck in place and tighten the neckscrews.
8. mount all the rest, pups. control plate, jack and solder what needs to be soldered,
9. Now check if your bridge is in the right place for the scale, whether it has enough headroom for the action (saddles up as well as down)
10. plug it in and do the screwdriver test. Touch the pups with a screwdriver, checking the postion of the switch and see if each pup makes a corresponding sound.
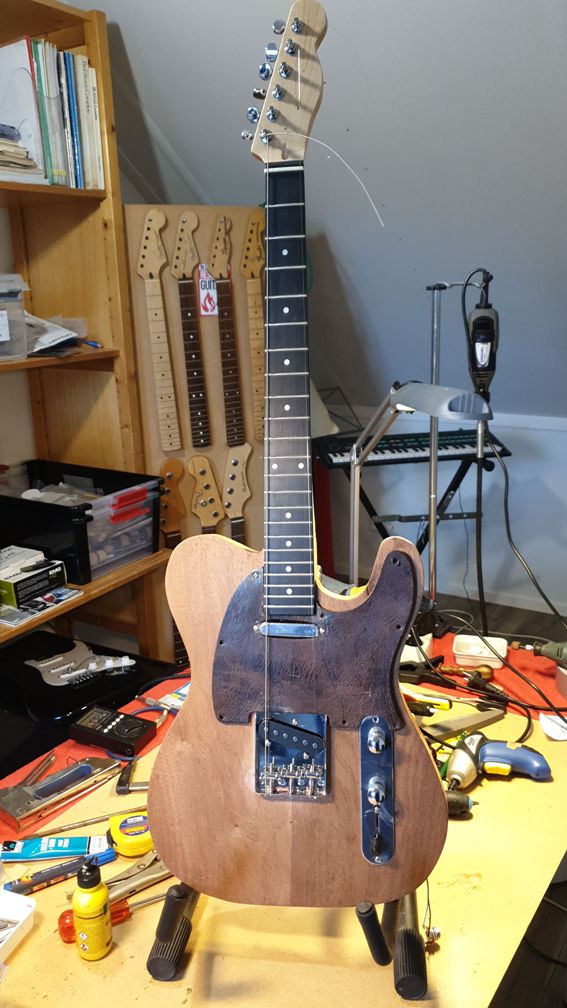
Finalize and do a first setup
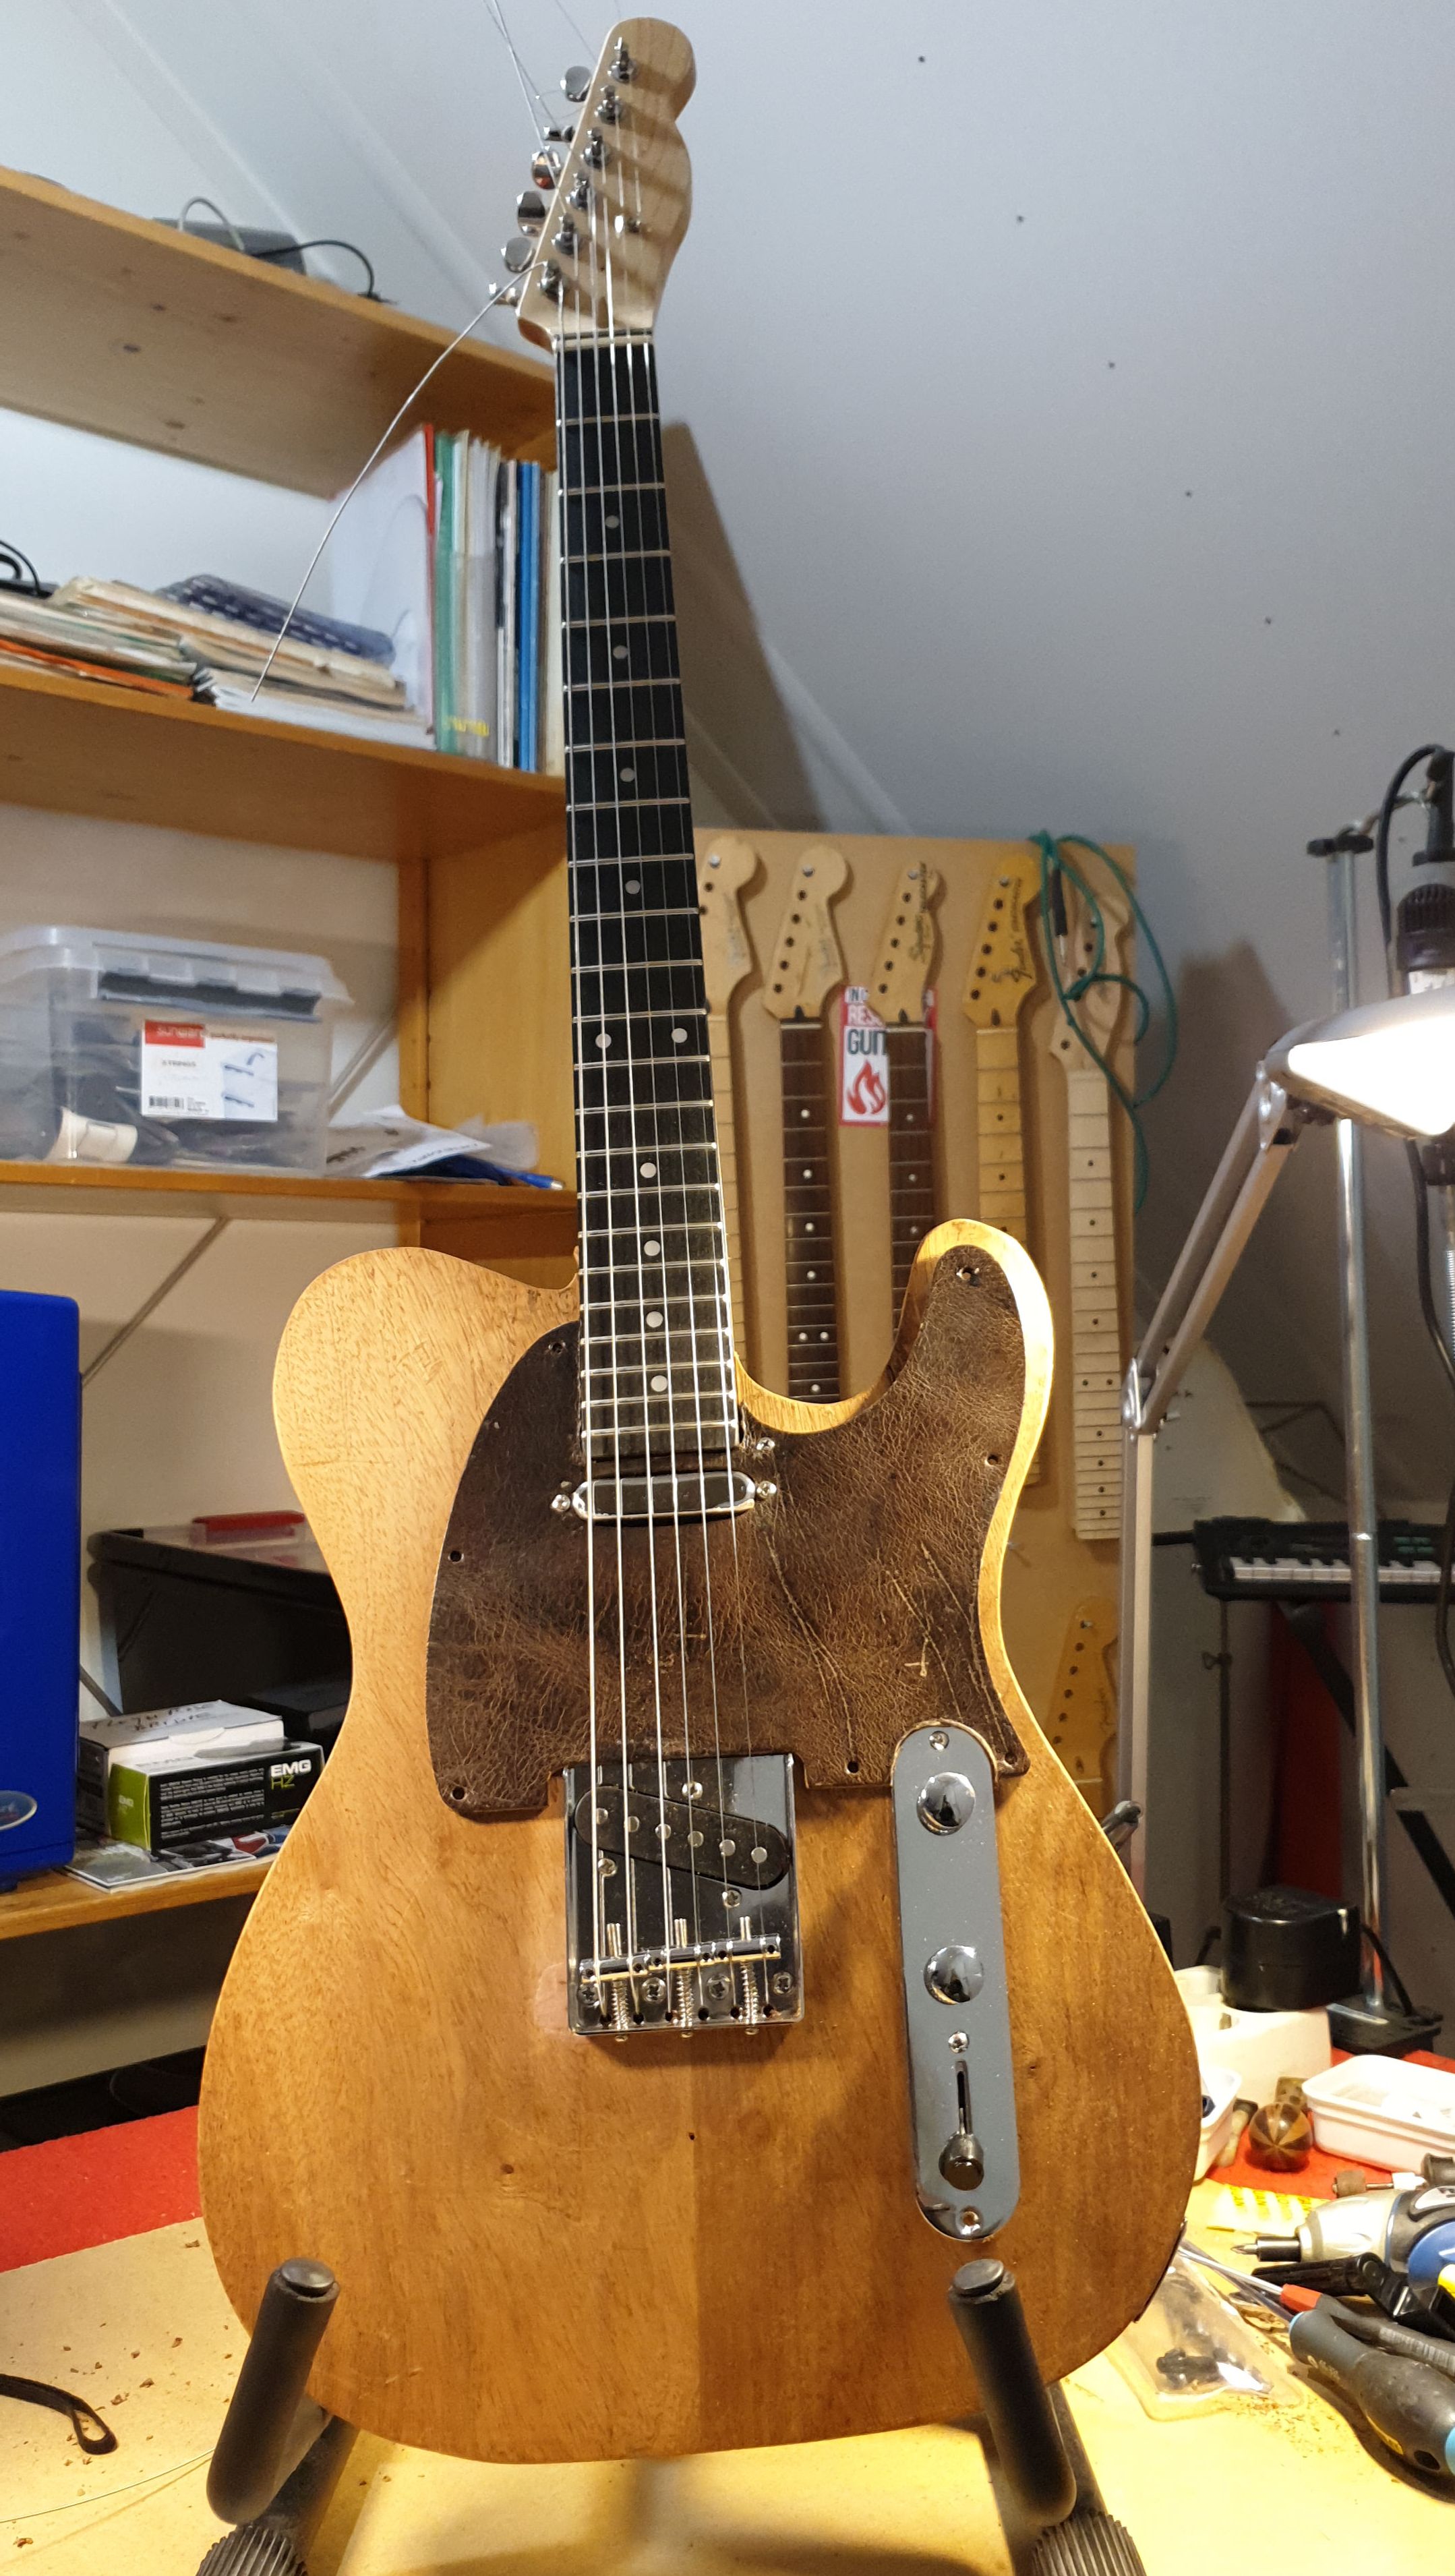
I used a leather pick guard that was hiding i a drawer and suddenly looked good on this guitar.
The pups are cheapos taken from a kit i had for the parts, eventually i will get some better ones, even so the mahogany sound is quite good, almost acoustic.
I now wil take the thing apart and do a good deal of sanding and such and then i most likely will add a few layers of nitrocellulose paint.
That will follow, for now i am done.
If you reached this point, you have basically built a very nice Tele and you have enough kit to make a few more. Each one gets easier.
Old oak with epoxy layer
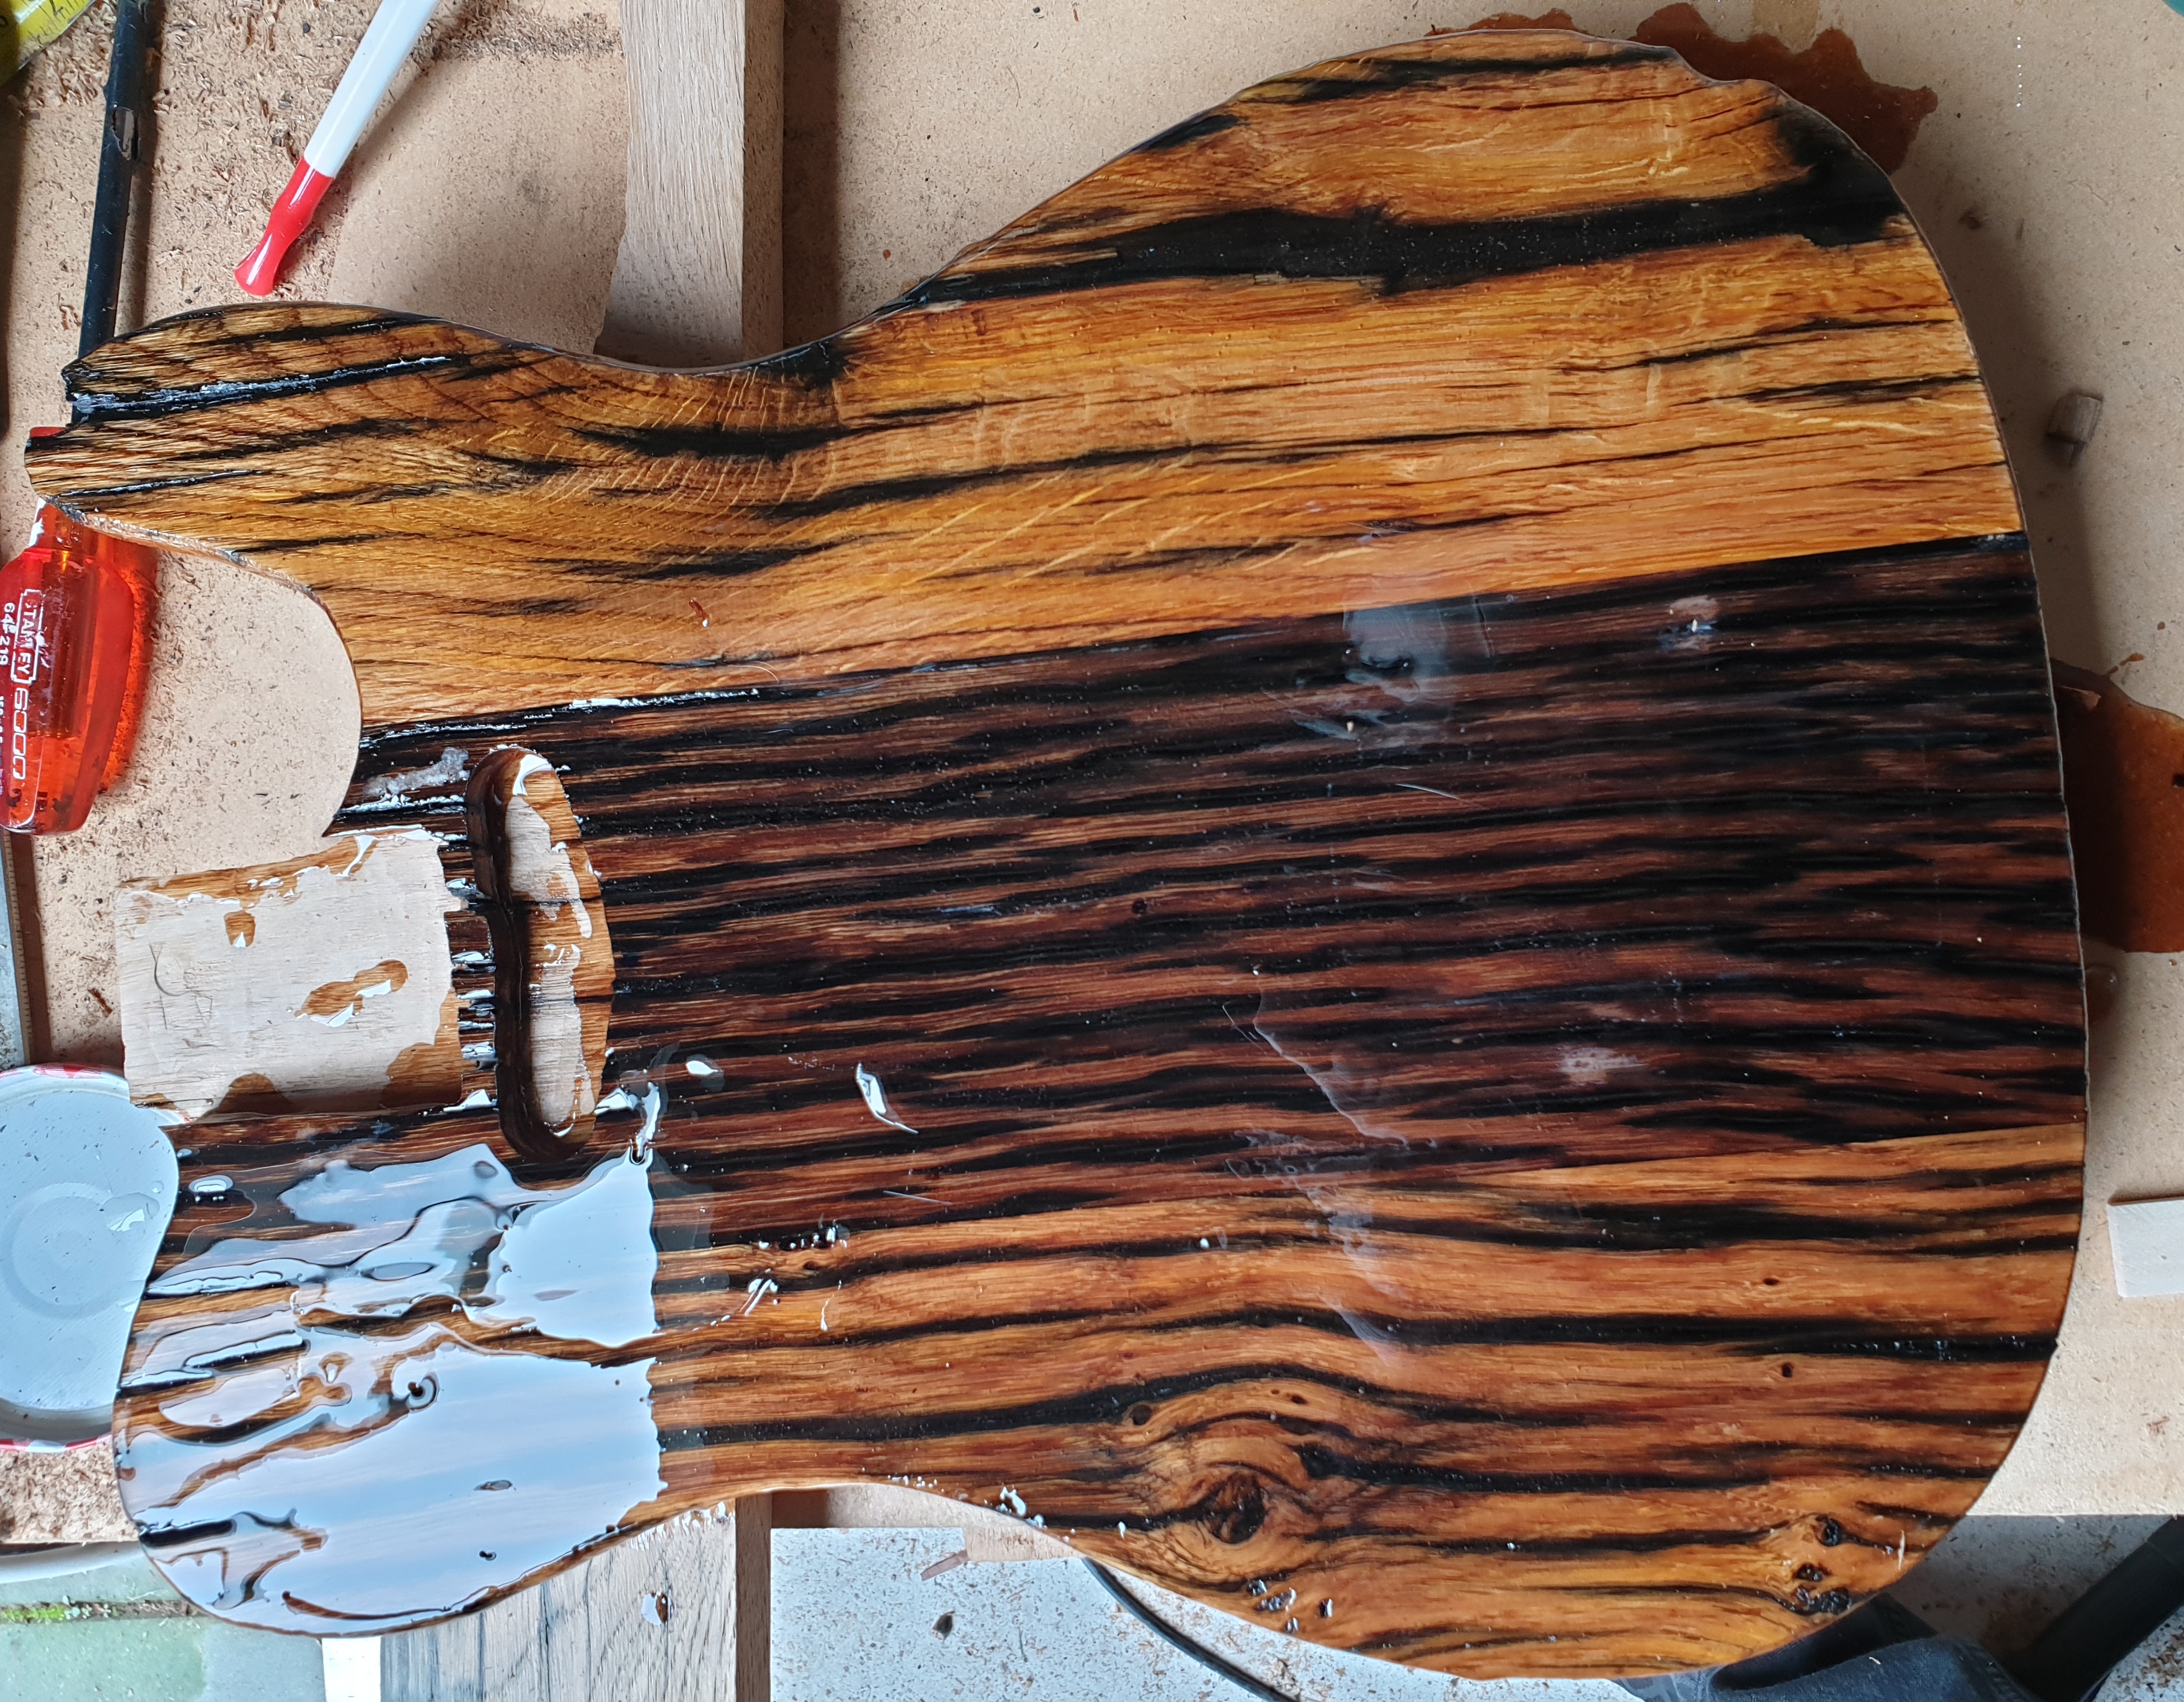
I will make a series of bodies from a batch of 200 year old oak. These are from barns and extremely weathered on one side.
This one is covered with a fairly thick layer of 2componenet epoxy resin. Takes some time to harden ( a week at 20 degrees C). but the effect is quite stunning.
Still need to route out the remaining cavities. The cavity for the pots will be backrouted and i will not apply a pickguard.
Spraying and finishing
Here the result for the time being. Sprayed with nitrocellulose blank using spray can. One body easily uses a whole can 500ml, so for one thats ok. If you repeat this better buy in litre or more cans, not the spray - fairly expensive.
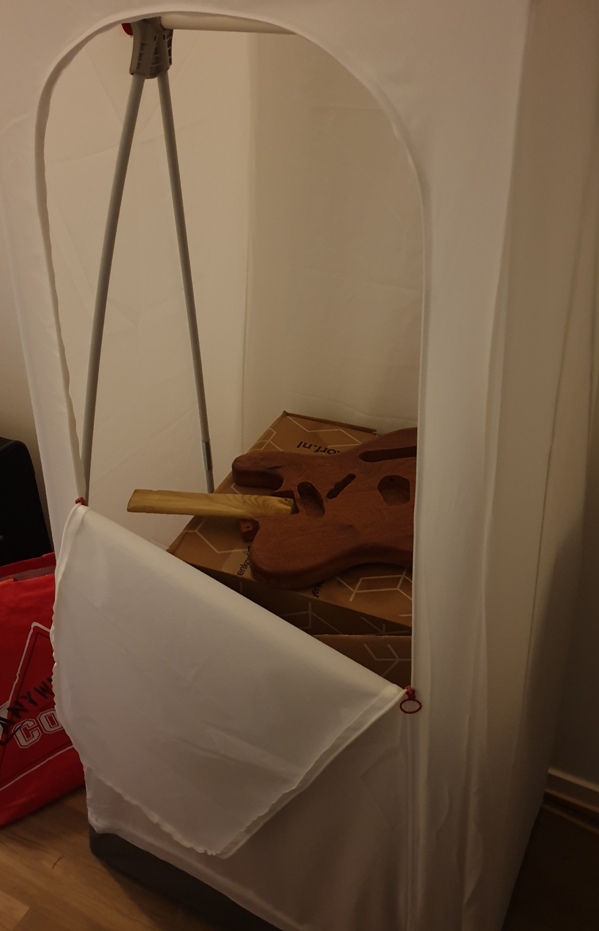
I use an Ikea foldable (more or less) clothing storage thingy, as spray cabin. Works fine. You really need this as the spray mist will cover much more than wanted if you do it in a room.
It doesnt help the smell, so ventialation is recommended - too much may make you woozy.
Telecaster or Stratocaster neck
As with the body i started first to make a template, in this case by copying a Tele neck. I used a very cheap chinese neck with the right dimensions.
If you dont dare that, you have to revert to drawing and sawing with a bandsaw - which is safer, but more work.
You have to be aware that in case you make an error during the routing phase below, you very easily blowout your original neck. So, check every step twice before switching on your router.. You can protect the original neck somewhat by applying a layer of duct tape all around.
Attach the neck upside down to a piece of wood (not mdf in this case) with two small pieces of double sided tape. Wood at lease 1 cm thick.
Turn the whole thing upside down as in the picture.
You will need a bottom bearing bit long enough to reach through the template material to the neck. Sharpen your routerbits first with diamond files.
You need TWO depth adjustments.
1. for around the headtock and the neck heel
2. for the sides of the neck., such that the ball bearing rides against the neck just at or a fraction below the fretboard.
Mark the points where the headstock turns into the rounded part of the neck, same for the neck heel.
Adjust the routerbit such that the bearing rides against the side of the headstock.
Very very carefully start routing around the headstock where it sits flat against the template wood.
Use the same depth to route around the neckheel.
NOW, re-adjust the routerbit depth so that it will ride against the side of the neck at its widest point.
Route out the sides of the neck. DO NOT go where the headstock or the neck heel live, you will eat into the neck.. Good bye neck and template.