Index of subjects
- The parts
- Building the bass
- Electronics
- Setup
- Shim
- Adjust neck relief
- Adjust action
- Pup to string distance
- Intonation
- On slotted tuners
- Questions or order the Precision book?
BUILD A RECYCLED or JUNKYARD Precision Bass
using new, used or cannibalized components.
This page is an abstract of my book on 'How to build a PBass". You can - if you want to - buy the book here via the webshop.
Alternatively you can get the books as ePub somewhat cheaper on Amazon/Kindle or Apple's iBookstore
It takes some time and effort to search for a complete set of discrete copmponents, but the search itself is a lot of fun, educational and will produce an instrument to your own specs - and possibly some unused kit.

The hunt for PBass components
The Precision kit shopping list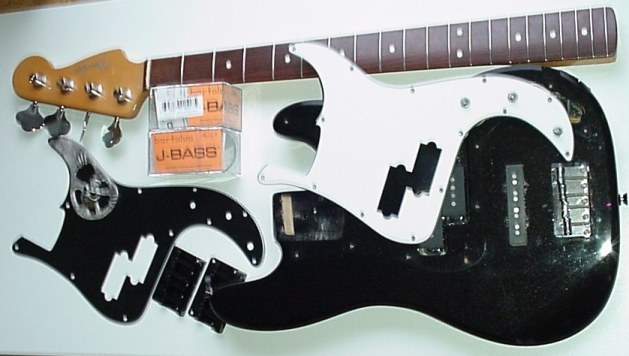
Parts
Here's the start. First you have to get - preferably - matching components. After a lot of searching on Ebay and elsewhere (and buying components that I cannot use!!) here is the set I have based the book on. If you want to control the cost take your time, reckon with about 3 months elapsed time to get all parts.
And be patient. Don't buy too quickly.
And count holes. Make certain that the number of screws in a part match the number of holes in the counterpart. I overlooked this a number of times.
I found the following parts for this project:
A Squier body, some sort of metallic black, quite nice actually. My own Pbass is a reasonably vintage 1974 so I was not prepared for the JBass pickup position near the bridge. Officially this is a P&J type. I got the body fairly cheap, which was a good reason to stop search and look for the other componenents.
Bartolini set of P+JBass pickups - new, expensive.
A black pickguard and a black bridge and again a good but incorrect Badass bridge which I luckily could sell on fairly quickly.
Just for the heck of it i bought a pewter skull ornament to fit on the pickguard from a friendly artist in the USA, highly recommended. Totally useless.
This cocktail finished off with a nice RI 62 neck, which came fairly expensive as I ran out of time - that's never a good buying position.
Here is your general shoppinglist:
Neck and body
Pickguard , 8 or 11 or 13 screws
Tuners (open or closed) , 4 or 8 screws
Pickup precision, 2 screws and mounting material
Pickup jazz type, 2 screws plus mounting material (not needed if you have pure breed Precision body)
Neckplate, 4 screws
Jackplate and jack receptacle, 2 screws (or none for standard single pup PBass)
Strapholders, 2 screws
Strings
Shielding, with one optional screw
Building it together
Following is a simplified step-by-step guideline how to put it all together, resulting in a real bassguitar.
Pickguard
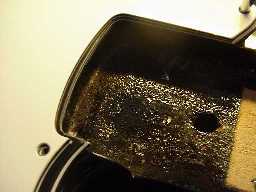
One of the nasty surprises while building is when something doesnt fit, as you can see here (the black pg sits underneath the original white one).
I really wanted a black pickguard but had to use the Dremel tool to very carefully make it flush with the neck cavity. Pickguards almost never fit completely. Btw satay sticks are very useful tools, as placeholders for the PG, while you are trying to match the screw holes and neckcavity and great to use them as material for filling up unused holes .
The black pickguard only had one screwhole in common with the body. So i had to take my trusted satay sticks and make 12 dowels as deep as the holes in the body. Put them in with a tiny bit of wood glue and if you like top them of with superglue or black lacquer (in my case).
As all the holes are under the PG a drop of superglue will do., but only the wood glue is sufficient in fact. Careful, superglue will dissolve your original finish if you drop some.
After finishing the electrical circuit wiring (see 3.) and soldering exercise, now put the PG in place, predrill the holes and fix the PG.
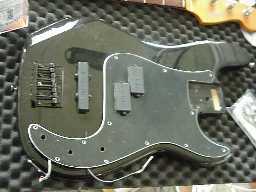
Pickups mounting
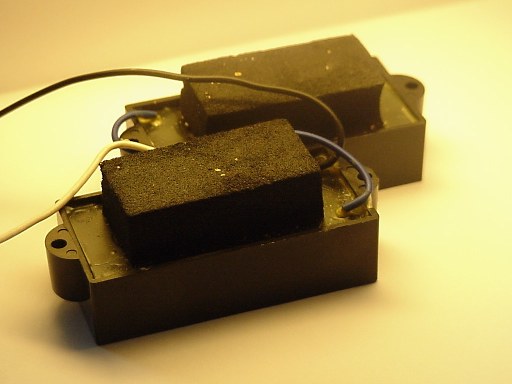
Each pickup is mounted with 2 or 4 screws with a piece of foam under each PU allowing height adjustment (instead of springs).
Here the classic P-type, each three pole pup with foam and two screws. Alternatively you can use springs or plastic tubing instead of foam.
Shielding
As with the other instruments apply shielding inside the cavities. Make certain that the shielding connects to the mass/ground of the electrical circuit.
Bridge
There should be a ground wire from the electronics cavity that goes under the bridge. Make sure its about 2 cm stripped bare (preferably tinned with solder) so that contact with te bridge, and thus strings etc is optimal.
Pickup electronics soldering
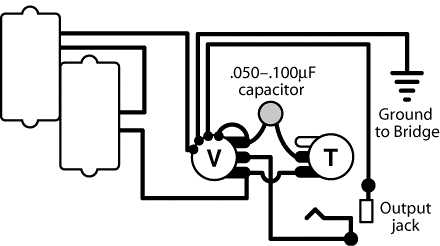
The standard PBass wiring is dead simple.
One pickup, one volume pot and one tone pot. The drawing on top shows the connections. The body i stumbled upon for this project has a hybrid P & J configuration - life is never simple. When you do Frankensteins surprises are bound to happen.
I bought the P&J based body, which needs one P-type and one J-type pup. As a consequence this version needs two volume control pots (and thus the space for the jack on the pickguard is occupied, the jack receptacle for these basses sits on the side of the body).
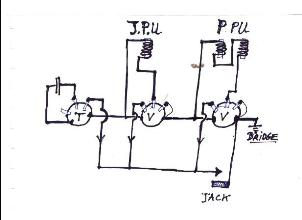
In order to allow independent volume control for each PU - without a selector switch - a slightly different connection to the volume pots is required per PU for the 2PU setup. The rough sketch shows the connections to the volume pot for a bass with two pickups - like this combined J+PBass set up. The difference is that the signal lead from the PU is connected to a different pot lug.
There are more circuit variations, which i will not discuss here. A pot is a basically a fixed resistor (250 or 500 kOhm) and a moveable sweeper that runs over the resistor. The resistance between the sweeper connection (always middle lug) and either side varies with the position of the sweeper. A pot is used to attenuate a signal - or in plain english 'make it less loud'.
Following are the steps to take in case of replacing pickups, with the rest of the wiring already in place on the pickguard.
1. If not yet done; now that you have access to the cavities it is a very good idea to apply shielding. Use selfadhesive alu foil or iron oxide paint or both. Or copper foil if you have the $$.
2. Wriggle the leads from the pickup cavities to the electronics cavity. There should be interconnecting tunnels. For each PU there is either a pair of black and white leads OR a shielded wire.
2.1. For a single PU vintage setup solder the white signal wire to one left or right extreme lug of the volume pot (the other extreme lug will already be mass). Solder the black wire to the casing of the pot.
2.2. For a dual PU setup solder the signal wire to the middle lug = the sweeper - of one volume pot The black mass or earth wire goes to the casing of the same pot. In case of a shielded cable the core carries the signal, and the mantle (woven metal mesh) is always mass.
3. Solder 3 signal wires from the pots (tone and two vol) to the output jack. Mind the difference between vintage and dual PU setups, so take the output either from the sweeper or from one lug. In case of vintage setup you may have only one or two signal wires (depending how the engineer connected the tone pot originally).
4. Now solder a connection between the mantle of the jack and one of the pot casings, which is mass, earth or simply the return path.
5. If you added shielding, add a good electrical connection between shielding and mass-side of your circuit.
6. Refit the jack in the jackplate and the pots to the pickguard.
7. With all the connections in place now get an amp and plug in your instrument. Listen for hums and other nasty noises. In case of noise recheck your connections, especially mass and shielding before putting the 13 PG screws in place. This time i've made no mistakes (sofar), the amp doesn't make more noise with the circuit plugged in than without.
You can test the pups without strings by tapping the magnets with a finger; if you dont hear anything restart.
Now to fixing the PG in place and on to the neck and setup.
Adjust neckpocket
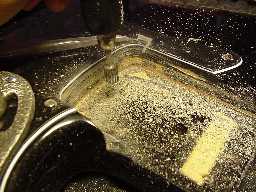
As it turned out the neck-body fit was not perfect as frequently is the case when mixing components. I needed somewhat less than one millimetre in the neckpocket. This is where the Dremeltool and a very small routerbit come in very handy. I use a flexible bitholder.
Here I dealt with the pickguard and the neckpocket in one go.
As in the photograph hold the routerbit almost vertically using low rev. With long controlled movements and very very little pressure take away small layers. Don't hold still while the tool is running as it will create a nick in no time. Best exercise a bit on a raw piece of wood.
I needed just that little bit off, and the neck now fits snugly in the neckpocket. Leave the protective foil on your new pickguard as much as possible until you have finished this step. You easily slip with a nasty scratch in your shiny scratchplate as the result.
Mounting the neck
Same as for the Strat
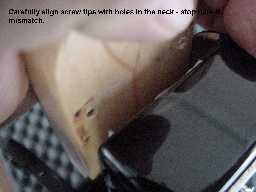
Turn the screws into the body so that they just emerge above the face of the neck cavity.
Match the 4 screws carefully against the corresponding holes in the neck
Tighten the screws going diagonally as well as round the clock, take care all screws are tightened and with the same force.
This is not necessarily the first step. You can opt to mount the neck at a later stage.
Check need for SHIM
We need to check early whether the tilt of the neck w.r.t. the body is too small, to large or just right. Here you need at least one string mounted, not necessarily tuned.
If - with the saddles in the lowest position the action is still too high you must place a shim in the neckpocket towards the tail end.
If with the saddles in the highest position (or almost highest) the action is too small or the string still rests on the fretboard you have to place a shim in the neckpocket towards the heel of the neck.
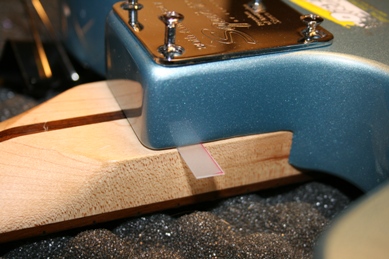
In case it is just right, some people place a .25 mm shim anyway. The .25mm gives you an exra .8mm at the bridge.
The first situation occurs quite frequently, the latter rarely.
I have sheets of .25 mm and .45 mm plastic in stock.
Check alignment
Next I mount the low and high string and check if the neck needs a shim in the horizontal plane. In some cases you may need to realign - worst case 'start all over'.
My project has a hitch at this point. The neck is not very well aligned. The E-string is too close to the edge and the G-string too far from.
There are three options:
a. slightly loosen up the screws and in playing position shift the neck in the right direction - my case down towards the G.
b. if that fails further loosen up the strings and try a very thin shim - playing card plastic is known to be used - in this case on the E-side of the neckpocket.
c. if that fails take out the neck and take of some wood on the G-side of the neck pocket.
The trick under a. above will work nine out of ten. Leave the strings on with only enough tension to show alignment, loosen up all screws slightly, take the bass in playing position, grab the body under your right elbow and with the right hand push and hold the neck downwards (in my case) in a position that makes you happy.
With a screwdriver in your left hand now start tightening the screws, diagonally and clockwise untill all screws sit.
Warning if you push or pull the neck and you need excess force to get an ok position, STOP as you may crack the neck cavity sides. In that case you may have to get your router, Dremel or file out in order to widen up either side of the neckpocket.
Done sofar
Of course you know the difference between vintage (slotted) or modern (hole thru) machines. If you don't, see notes
- adjust the saddle height such that there is no rattle in any position on the neck. E string is the heaviest with the largest amplitude, so if it doesnt rattle fair chance the others won't either.
- pre-adjust remaining saddles to follow the radius of the fretboard. More on radius later.
- preset intonation. Adjust saddles now such that the distance between topnut and fret 12 is the same as between the saddle contact point and fret 12. Fret 12 is in the middle. Take the gauge of your A string and move the saddle in the direction of the headstock with that amount relative to the lowest string. Repeat that for the remaining strings.
- Depress each string on the last fret and adjust your pickups such that the strings don't touch them.
Next step is precise setup and intonation, using some formal factory measurements. as well as personal preferen
- Check if you screwed all screws
- at this stage definitely plug the guitar in an amp and see if it produces a guitarish sound. If you only hear a terrible noise the most likely cause is that signal and mass are reversed, so check your soldering to the jack.
If you hear nothing at all there is probably a short between two wires or a soldering joint got loose.
If thats satisfactory you get to the most important point : setup.
Set up
Now we have built a bass there is a fair chance that it is not very playable.
The set up is by far the most important step in the process; you can take a very simple, cheapo guitar and with a good setup make it a great instrument. A 10000 dollar 1956 Bass with a lousy setup will only yield a lousy guitar
Neck relief
This can be tricky if you overdo, so take it very very slowly.
Tune to pitch, which is important as the relief will change with string tension. Place a capo on postion one = just before the first fret. depress the E4 string at the last fret. Now measure at fret 8 the space between underside of string and top of fret. See table under 'radius' for guide.
If you find the distance too large the neck is too hollow and needs to be straightened using the trussrod. Turning the trussrod clockwise - quart at a time - will straighten the neck. Anti clock will allow more relief. Dont forget, these are guides. If you like the neck more one way or the other, experiment! My own bass here was below the smallest measure for the radius at 0,2 mm, almost straight. However as there weren't any rattles I decided to leave it at that. For a 5 string bass I probably would have given some more relief.
You need a hex Allen tool for this, somewhere 3.5 to 4mm, but check first.
If the neck is too concave release the trussrod (turn anticlockwise), the strings will pull the neck into position. Some guitars have a trusrrod that can work bothways. Standard is however a trussrod that only pulls the neck straight.
Setting the action
Tune'r up.Adjust the bridge saddle such that the measurements at fret 17 are between 2,4 and 2 mm. Or adjust to your liking checking out for rattle along the way.
Remember, the bass strings are bigger so need more space when vibrating.
Adjust by raising or lowering the saddles using the small Allen (typically 1 or 1.5mm) hex tool.
Here you may hit a serious problem if the neck tilt w.r.t. the body is wrong - see below.
Neck tilt and shim
If you find that you cannot reduce action because your saddles are at their lowest posible point its time for a SHIM.
Shimming means that you take a small piece of plastic (or whatever material) about 0.25 or 0.45 mm thick and about 5cm by 1 cm, and place it in the neck pocket before the screws on the closed side (away from the headstock). This will change the action, normally enough to be allow adjusting the saddles again. In general one 0.45mm shim will do the job.
If you find that the saddles are in their highest position with strings to low or even touching the neck, place a shim at the other side of the neckpocket.
Obviously you will have to unscrew the neck for this operation.
See section SHIM above.
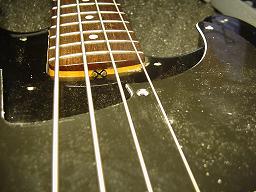
Pup to string distance
With the bolts either side of the pickup adjust the distance between polepiece and string to around 2.8 mm (bass) to 2mm (G) whilst depressing the string at the last fret.
Experiment, but as you take a smaller measure check sound and sustain as the magnets can mute strings if too close. Too far will of course yield a lower output signal.
Setting intonation
SCALE: the standard scale is 864mm, that is the stringlength between nut- and saddle contact points. For G1 this is the starting point, the thicker strings have a slightly longer scale. Here you really need a very good electronic tuner. Tune up correctly.
For each string:
Play the harmonic above fret 12, then compare the note when played with the string depressed on fret 12 These notes should be the same. If not the same adjust stringlength by moving the saddle back- or forward. A stroboscope tuner is the most accurate, alas, also the most expensive. We lesser beings hope to do with a good digital tuner (works well enough!).
Adjust by moving the saddle in the parallel to the string. Doing this you make the string shorter or longer in order to get that all important point directly over fret 12 Repeat this for each string and then recheck again as these adjustments can affect the neck relief.
This is by far the most important step in the setup, you have to do this. Worse, you have to do this each time you change any of the above settings!
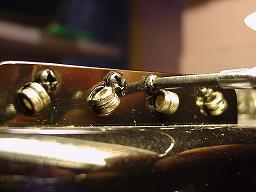
On slotted tuners
Of course you know the difference between slotted or vintage and modern tuners, huh?
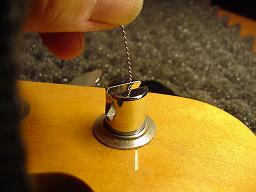
Just in case, here's the basics. Vintage are as in the photograph, ah well slotted, modern just have a hole thru the peg. String'r up as follows:
1. stick the string in vertically down the center.
2. bend horizontally
3. pull half turn around the peg
4. start winding up neatly, no crossings whilst keeping tension on the string by hand until it pulls tight
Using an undrilled PBass kit
See the Strat page for a more or less complete story. This will by and large work for the bass as well.
Done
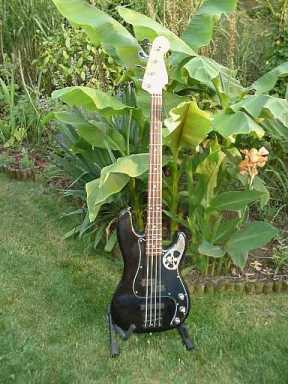
Here is a possible endresult, sounds awsome.
GUITARS RECYCLED - CONTACT
Use this link below to send me a question or order the Precision book: