The building books on Amazon Kindle as eBook
The books are now also available on Amazon Kindle for half the price of a hardcopy book, more if you take transport in to account (shipping is rather expensive, to say the least). The big difference is the printing cost of colour paperbacks. Ebook pixels are basically for free. Have a look.

Index of subjects
- The parts
- Building the guitar
- Electronics
- Setup
- Shim
- Adjust neck relief
- Adjust action
- Pup to string distance
- Intonation
- Question order the Telecaster book?
BUILD A RECYCLED Telecaster

using new, old, vintage, used, new old stock or cannibalized Telecaster components.
Building steps
Following is a simplified step-by-step guideline how to put all Tele components together, hopefully resulting in a real guitar. Some of the steps can be done in a different order, everybody has his own preference.
Also see the recent page how to make a telecaster body from a slab of wood - not for the fainthearted!
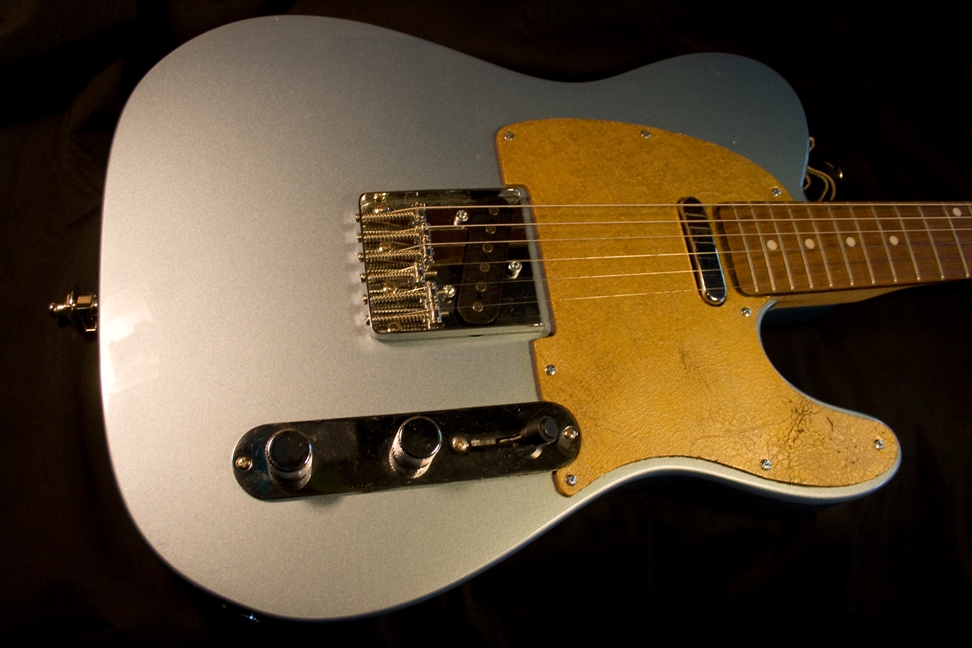
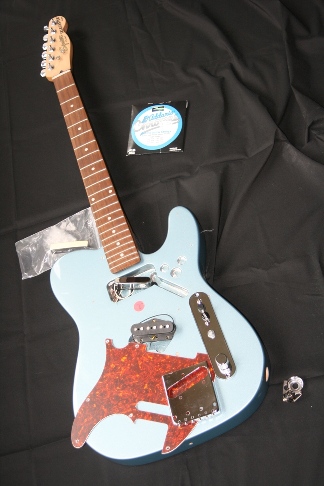
I assume you have all the necessary components like in the picture here on your bench.

At the end of the page you find an overview of all parts with some advice how to watch out for crap when you buy them on the net, or elsewhere.
Mount the neck
Same as for the Strat. Dimensions and method is exactly the same for a Strat. The obly difference between a Strat and Tele neck is the shape of the heel.
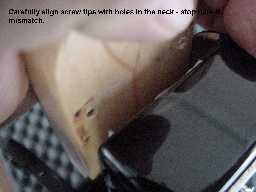
Turn the screws into the body so the tips just emerge above the face of the neck cavity. Dont forget the neckplate!
Match the 4 screws carefully against the corresponding holes in the neck
Tighten the screws going diagonally as well as round the clock, take care all screws are tightened and with the same force, not too much force though!
This is not necessarily the first step. You can opt to mount the neck at a later stage.
Before you do this check if the neck heel fits the body. If the heel is too large, you may cause cracks in the neck pocket. Careful.
If the heel is smaller than the pocket, it may sit a bit loose. Not necessrily a huge problem, but you have to check when the strings are on if the neck sits straight.
Apply shielding
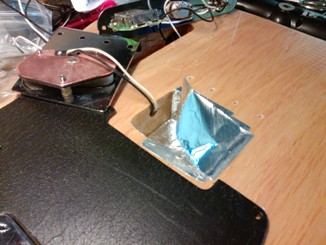
Get alu adhesive tape and apply shielding to the inside of the cavities. Make certain that the strips slightly overlap and also overlap a tiny bit on the face of the body.
There they will contact the shielding on the back of the PG or conrolpanel and create a nice closed Faraday cage. What the f@#& is that? It will prevent noise RF signals to enter your amp. Also see Electronics page..
This really helps to reduce all kinds of weird noises.
Check need for shim
Easiest way to do this is to set up one string. So you need the neck with at least one tuner and the bridge in place to do that
We need to check if the tilt of the neck w.r.t. the body is too small, to large or just right.
If - with the saddles in the lowest position the action is still too high you must place a shim in the neckpocket towards the tail end.
If - with the saddles in the highest position (or almost highest) the action is too low or the string still rests on the fretboard you have to place a shim in the neckpocket towards the heel of the neck.
Modifying the heel is NOT DONE..
You can also find out the need for shim when the guitar is completely built, more work but not impossible. You dont even have to take the strings off. Loosen the strings and loosen the neck screws enough to wriggle a shim in place.
In case it is just right, some people place a .25 mm shim anyway. A shim of 0.25mm gives you an exra .8mm at the bridge.
The need for shim arises from the fact that with a frankie you use parts from different sources, factories that may be in Fender spec, but just a tiny bit off.
The first situation occurs quite frequently, the latter rarely.
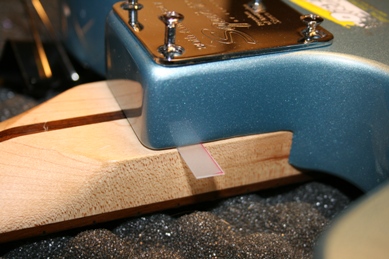
By sheer coincidence the guitar of this project suffered the second issue. See the picture. This was a bad case of the shims, I needed almost .9 mm shim. (two sheets of 0,45 mm).
I have sheets of .25 mm and .45 mm plastic in stock. I tend to use .45 mm right away.
Mount the pups
The neckpickup in this case is mounted with two screws and a piece of compressable foam (similar to the PBass) or springs. Thats the vintage way. Take care to mount it exactly lined up with the middle of the fretboard and in this case (humbucker route) flush to the neck side of the pocket. Check the fit with the PG.
Once the PG is placed you can not access the adjusting screws without removing the pickguard, in combination with a 22 fret neck.. If you have a 22 fret neck you can only remove the pickguard by detaching the neck. So plan carefully.
More recent models have the bridge pup mounted on the pickguard, strat-style. Not very vintage but much very easier.
I found some rough worn style leather pickguards (very nice) which are slightly flexible, these can be taken off without detaching the neck.
You can also choose to mount the pup Strat-style on a pickguard. Such a pickguard has two holes to accommodate the adjustment bolts.
The bridge pickup is mounted with spring and three bolts on the bridge baseplate, easy. Like the Strat pickups.
Lead all the wires to the control plate cavity.
Solder all connections
Solder the signal lead from the PU's to the input lugs of the switch.
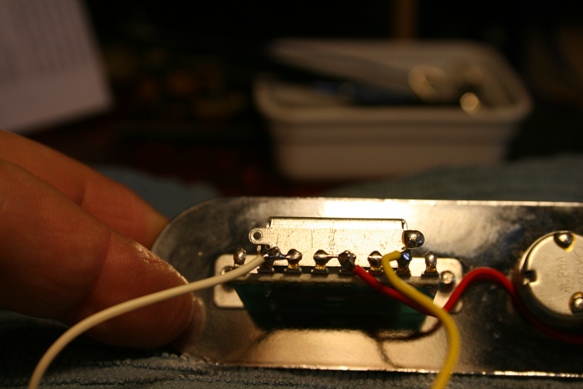
You can figure those out with the drawing later on this page. Preferably - really, really recommended - buy a cheapo multimeter tool for the purpose (see also the page on electronics and mods). You do need to bridge two lugs in order to accommodate the selection of two pups thats with the selector in the mid position; determine these lugs with a multimeter. This can be different for different types of switches, hence the need for the multimeter.
Here the white lead is the neck pickup, the yellow lead the bridge and the red wire is the output that goes to the pots and eventually a lead goes from the pot's output to the jack (receptacle).
Solder the black wires (mass) to the casings of the pots or the switch somewhere.
The little video here shows a bit more.
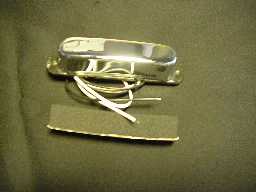
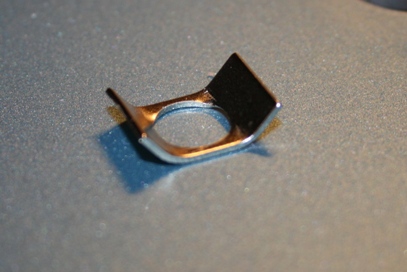
Mount the jackcup and the retainer clip (vintage style)
The funny little piece of scrap (see picture earlier on this page) metal was used by Leo to invisibly fix the cup in place. You preferably need a tool for this!
Here is the tool in use, a complete explanation is in my book and on the leaflet StewMac provide with the tool.
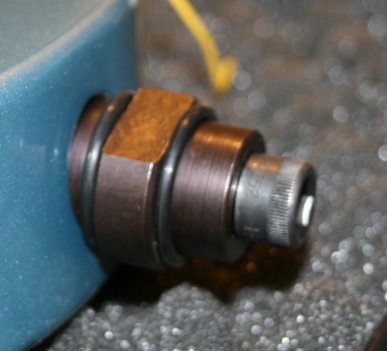
Do not use pliers as they will slip and scratch, guaranteed.
No tool? Dont wanna buy a tool? Dont like Stewmac? Be my guest, give it a try with pliers and whatnot.
Alternatively get a non-vintage cup with two or four screws. Saves a severe headache!
Mount the (loaded) pickguard and the controlplate on the body
That completes the electronics almost. Now place the control plate and the pickguard. but leave unscrewed.
Then you can place the neck again - remember the 22fret neck has to come off in my case in order to mount a solid pickguard.
I wouldn't put an 8 hole PG on an 5 hole body or vice versa - dont like drilling if not necessary. So get another PG if needed.
If not already done, now check the holes in the PG against the position of the corresponding holes in the body. With almost 100% certainty one or more holes will not match. Get your trusted satay sticks out, look for the best position of the PG with a corresponding hole and fix that in place with a sate stick. Repeat with as many holes as possible.
Now mark the remaining positions on the body and drill with a 1.5 or 2mm drillbit.
Lead the necessary wires to the control cavity and solder a wire to shielding and one to the bridge.
Fix the PG in place with 4 or 5 screws - rest will follow at the end. Don't fix all screws in case you still have to step back and unscrew for some reason.
Wire up output cables to the jack connector . You will have two wires coming from the PU s, one black and one white or a shielded one.
The black goes to the outside of the jack connector, the white goes to the core. If in doubt check with your multimeter.
Wriggle the jack connector thru the body and mount it in the cup. Use a fitting wrench (in most cases a 12mm will do).
Alternatively you may have a shielded cable here. The mesh (woven metal) is mass or ground, and the core carries the signal (also called hot).
THE SCREWDRIVER TEST - DO IT
Before you string' r up its wise to do the socalled screwdriver test once all the connections are soldered.
Plug the set into an amp and switch the amp on (in that sequence).
Take a screwdriver and switch the selector to the neckpup. Make certain the volume pot is on. Tick the magnets of the neckpup with the screwdriver.
If you do not hear anything, there is nog signal.
Try the same with the bridgepup.
If in either case there is nog signal go back and check your wiring. Something is wrong. Likely causes are a wire forgotton, bad solder somewhere, connections to the jack reversed, wiring on the switch incorrect (no bridges, wrong bridges). Doing this at t his stage you at least save a set of strings.
Done sofar - almost
Check if you screwed all screws.
YOu can now for the next step string up one string, E1 for example.
Now definitely plug the guitar in an amp and see if it produces a guitarish sound if a string is present. If you only hear a terrible noise the most likely cause is that signal and mass are reversed, so check your soldering to the jack. If you have no strings on yet, you can test by ticking each pup with a screwdriver - should produce a sound via the selected pup.
If you hear nothing at all there is probably a short between two wires or a weak soldering joint got loose. A quick go/nogo check before you string'r up is to plug in the guitar and tick with your finger on the pole pieces. The selected pickup should say 'tick' , the unselected pups should remain silent.
If you hear a terrible noise, most likely the jack connections signal/ground are mixed up. Check and redo if necessary.
If you the switch is in the neck position, but the bridge pup reacts, you have reversed the connections on the 3-way switch.
Now string up.
If thats satisfactory you get to the most important point : setup.
Setup
We have built a guitar, but there is a fair chance that it is not very playable.
The setup is by far the most important step in the process. You can take a very simple, cheapo guitar and with a good setup make it a very reasonable instrument. On the other hand, a $10000 1956 Strat with a lousy setup will just yield a lousy guitar.
Neck relief
Place a Capo on position one, just before the fret.
Now depress each string at fret 17 and measure open space between top of fret 8 and underside of string. This should be very small in the order of 0,25 mm. or less (my preference is 0.1). If the neck is too hollow you have to adjust the trusrod. Detune your strings to take away tension. Very carefully tighten the trussrod - a quarter turn at the time to the right (clockwise) will straighten the neck. Retune to pitch. Preferably leave it for some time to set and check again.
You need a hex Allen tool for this, most common 3.5 to 4mm, but check first.
If the neck is too concave release the trussrod (turn anticlockwise), the strings will pull the neck into position. Some guitars have a trusrrod that can work bothways. Standard is however a trussrod that only pulls the neck straight.
If you take this very slowly there is absolutely no risk, necks are remarkably sturdy and idiot proof.
I have several times had to deal with a far east kit where the trussrod was pulled far too tight, easy to correct with no ill effect ,but beware
Action
Action is the distance between string and frets. If too high the guitar is hard to play, if too low the strings will hit the fretboard or wrong frets. Action is very much determined by your own preference - more than the other measurements.
It is measured with the capo still at fret 1 and you look at the string height between fret 17 and underside of string. A good start is 1.5 mm for E6 and slightly less for E1.
My own procedure is to get as low as possible, to the point where you get buzz. Then raise the action just enough to take out the buzz.
Thicker strings need more space. Take it from there.
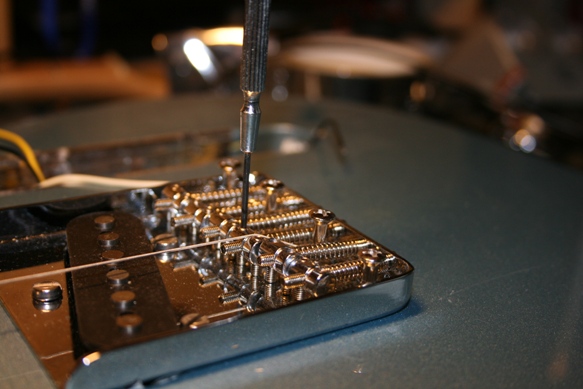
Adjust by raising or lowering the saddles using the small Allen (typically 1 or 1.5mm) hex tool (see pic above).
Here you may hit a serious problem if the neck tilt w.r.t. the body is wrong - see below.
Neck tilt and shim
If you find that you cannot reduce action because your saddles are already at their lowest posible point its time for a SHIM. This can easily happen when you - as I do - use components from various sources.
Shimming means that you take a small piece of plastic (or whatever material) about 0.25 or 0.45 mm thick and about 5cm by 1 cm, and place it in the neck pocket before the screws on the closed side (away from the headstock). This will change the action, normally enough to be allow adjusting the saddles again. In general one 0.45mm shim will do the job.
If you find that the saddles are in their highest position with strings too low or even touching the neck, place a shim at the other side of the neckpocket.
Obviously you will have to unscrew the neck for this operation.
Pickup to string distance
With the bolts either side of the pickup adjust the distance between polepiece and string to around 2.3 mm whilst depressing the string at the last fret.
With the 22 fret neck and a vintage pup mount you better adjust this before mounting the pickguard!!
For the higher strings take a bit less more like 2.1 mm. Experiment, but as you take a smaller measure check sound and sustain. The magnets can mute (pull) strings if too close. Too far will of course yield a lower output signal.
Nut cases
Here some ramblings on what to do in case you screwed up or otherwise made your nut unusable and you had to buy a brand new one.
Before buying a new one, accurately measure your neck- there are some tiny variations.
Slotting a new nut
The standard width of the nut is 43mm (be careful, there are always exceptions).
If you have a brand new (unslotted) one make the outer slots 3mm from the sides and divide the remaining 37 mm accurately in equal portions.
First saw the 6 straight slots and then make rounded slots for the EAD strings.. The depth of the slots for the wound strings should be roughly half de diameter of that string.
Adjust a new nut for action above fret 1
The string distance between fret 1 and string can be between 0.005 and 0.010 inch, which is 0.127 to 0.254 mm.
Chose your preference but always start high and then go lower (take for example .010). This means that the slots in the nut should be no deeper than the height of fret 1 and 2 (for example .040inch or 1.01mm) plus your choice from the above distance range.
Measure the height of fret 1-2 using a metal ruler and your automotive feeler gauges. .
Now add the chosen distance to your fret height and set the total with your feeler gauges (example now 0.005 inch or 1.27mm).
File (or saw) the slots down while holding your feeler gauges against the nut.
Test and re-adjust as required.
Don't go too low; lower than fret 1 means you need to start all over again but with a new nut. But using the feeler gauge will protect you from this.
When done I would fix the nut in place with only a tiny bit of wood glue, or nothing at all if it sits tightly!
A quick and dirty check is to depress at third fret and see if you "see light" between string and fret 1. If no light at all you probably have a problem.
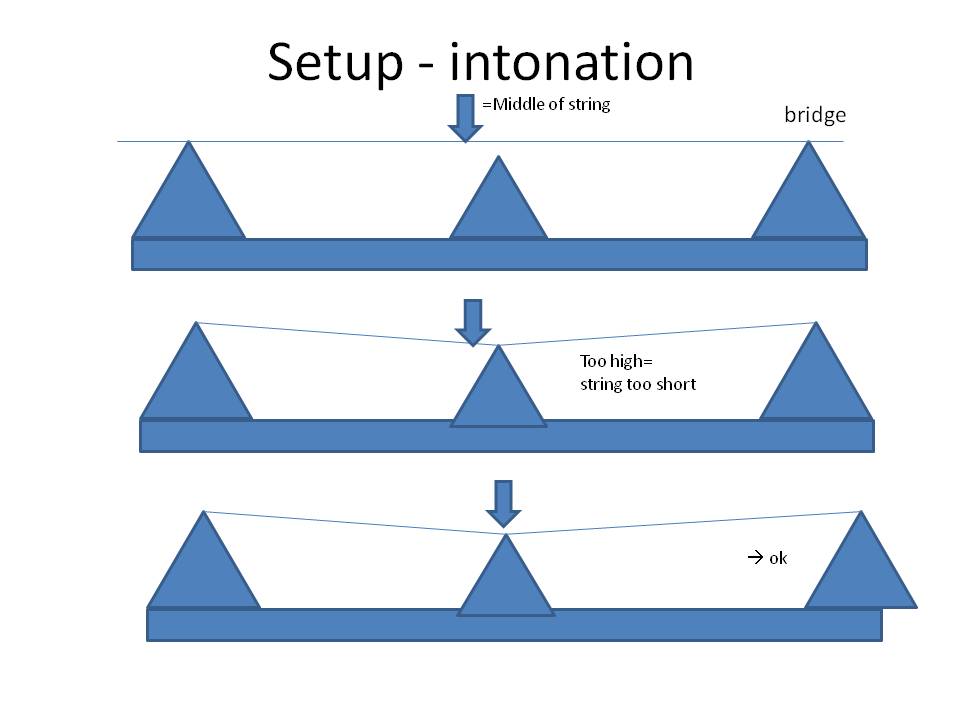
Intonation
This is by far the most important step in the setup, for many experienced guitarists this is still a mistery. You have to do this each time you change any of the other settings!
This is best done with a good electronic tuner, possibly a stroboscopic one if you have money.
Start by ensuring E1 scale length is 648mm, and from there the other strings each a tiny bit more (about the width of string itself). This will be almost right, but not good enough.
The principle can be seen in the picture here.
If the middle of the string doesnot match fret 12 of the neck a depressed note will be to high (sharp) or to low.
The picture illustrates sharp.
The depressed string is in fact to short between fret 12 and the bridge. Moving the saddle backwards will correct this. Simple, no?
Now for each string starting with E1 do the following:
Tune to pitch
Check the harmonic (flageolet) at fret 12 with the note when depressing the string at fret 12.
They must be the same.
If not adjust by moving the saddles for- or backward.
If the depressed note is sharp, increase the stringlength by moving the saddle backwards.
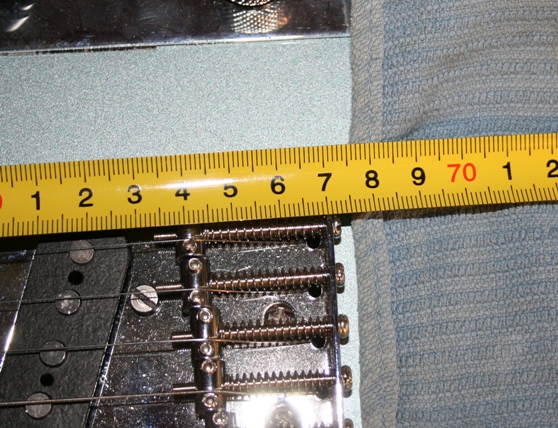
The picture shows the saddle on the bridge as it came off factory, 64 cm thus some 8mm off. Sounds awfully sharp.
The saddle should be at the 648 mm point, which will sound almost ok. But always do the intonation as above.
Using an undrilled Telecaster kit
See the Strat page for a more or less complete story. This will by and large work for the Tele as well.
Done
Here is a possible endresult, sounds awesome. Forgot the strapholders.

The hunt for Tele components
Parts
When you decide to build your own Tele; the first action is to get all the components. A typical package for a fairly standard Tele must have the components in the picture and more precisely in the shoppinglist below.
You can mix parts from genuine Fenders such as Squier, Mexican, USA without major problems. So a good Squier body with a nice USA made neck will make a very good instrument. Only pickguards and tuners normally require some holes to be drilled. Mixing with parts from other vendors may require some woodwork, but normally in most cases this works fine.
Your shoppinglist would look something like this:
- Neck and body
- Pickguard with 5 or 8 screws
- Control plate with 2 screws
- Pickup bridge with mounting material 3 bolts
- Pickup neck with mounting material 2 bolts, or two long screws (depending on style)
- Tuners with 6, 12 or zero screws depending on brand
- Neckplate with 4 screws
- Jack cup with jack receptacle with 2 screws or vintage type with a retainer plate instead of screws.
- Strapholders with 2 screws
- Stringtree (one or two) with 1 screw each
- Bridge with 3 or 4 screws
- Shielding tape with 1 optional screw
- Strings
What you must know about the components
Especially if you try to put together your own set, there are some pitfalls heading your way with each component. But that makes life interesting doesn't it?
Each part of the Fender guitars has a specific history and some variations you should be aware of.
Necks
Necks come in a number of varieties. The main things to watch are: the serial number and logo plus shape of headstock signifying origin and age (this will affect the price!). Beware of fake Fender decals.
Check for torque necks, worn out frets, loose frets, fret end sticking out,. cracks etc.
Fretboard can be maple or rosewood. Rosewood is said to cause a more 'bluesy' tone, and maple a 'sharper'.
Strat necks will work fine on a Tele body (and v.v.), same scale, same dimensions.
Wood, normally maple with a skunk stripe present yes or no (walnut inlay at the back enabling access to trussrod during building)
21 or 22 frets. See photo for a 22 fret example, clearly recognizable. Fits standard Strat body no prob.
Neck shape - if you are critical, C-shape, V-shape etc. neck.
Radius (i.e. the fretboard's curve), advanced stuff.
Apart from special models the neckplate is not critical, any neckplate from Strat, Tele or Precision will do. This is about the only component that will fit carefree!
Scale and rough (visual) intonation
The standard scale length of the Tele ( and the Strat) is 648mm, which is the stringlength between the nut and saddle points of contact.
For E1 this is the startpoint, fret 12 should then be very close to the middle. Scale lengths for the thicker strings are a tiny bit longer - the increment for each string is its diameter.
This a good initial way of setting rough intonation.
To fine adjust needs a bit more attention and possibly a good electronic tuner - will be dealt with below.
Bridges
As in the above photograph you can see how easily you buy the wrong bridge (bridge 3 screw, body 4)
Initially Tele's weren't my strong point and at a vintage show I bought a 'tele bridge'. Bingo, wrong one for the MIM body. I had. When you buy one insist to get the right screws with it. If you have to buy look for nickel, flat head and sunk. There are more different types - check the net.
Mounting the bridge is straightforward, screw it.
Also check if you have a 'string thru' body or one where the strings stay on top, you need a bridge to fit. Cheaper body's are often of the latter type, string thru gives a better sustain (as on vintage style Teles).
There are a few more variants, like:
- ashtray or just a flat backplate.
- three saddle or six saddle. Three saddle is vintage, but six saddle is better for intonation.
- three saddle but adjustable per string (costly)
Body
Things to watch out for are:
Age, paint original or refinished (should not be done to an old body). So if you see a 1955 body wich has been 'professionally' refinished - back away or do a very low offer.
Routes for single coil or humbuckers.
Bridge type and width (three screw, four screw).
String thru body versus top mount.
Wood type (mostly alder, ash sometimes mahogany) - requires some specialist knowledge
Regretfully bodies are not always clearly marked Fender, you have to trust the seller or decline - or get down the price.
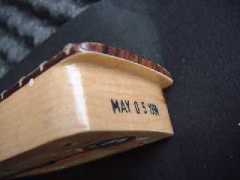
If there is a date stamp in the neckpocket, thats a good start.
Pickguards
When buying pickguards watch the correct PU configuration, single coil, humbuckers etc as well as the right number of screw holes. Most common are 5 (vintage) and 8 hole (regular). Its sensible (i.e. avoids work) to buy a pickguard that matches your body.
If you buy a pickguard off the market separately from the body it is absolutely guaranteed that one or more screw holes will NOT match those in the body. Not too much of a problem if you are prepared to drill a few holes AND fill the unused holes (cocktail sticks and satay sticks make great prefab dowls).
Another attribute of PGs is the number of layers, study those on Ebay. You see single layer, BWB, WBW etc.
Pickups
The classic Tele comes with two single coil pickups. Of course there is a very large choice now in other types, several providers such as Seymour Duncan provide nice overviews of all the types, their measurements and installation details.
The vintage style neckpickup (see picture above) is mounted like the PBass with two long screws going into the body and a piece of compressable foam as in the picture, or springs.
This gives a complication in combination with a 22fret neck because of the extended fretboard - you cannot access the pups without removing the neck!).
On recent Teles the neck pups are mounted Strat style on the pickguard with two screws., these pickguards have holes for that purpose.
The bridge pickup is mounted like the Stratocaster PU's, but with 3 bolts and springs or rubber hose or other compressible material. Rubber is better as it has less risk to cause funny resonations.
Pickguard fitting and mounting
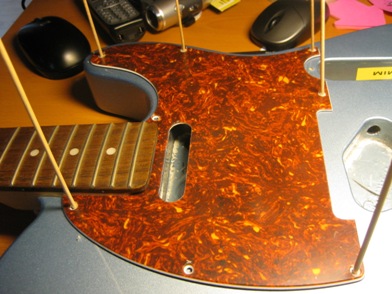
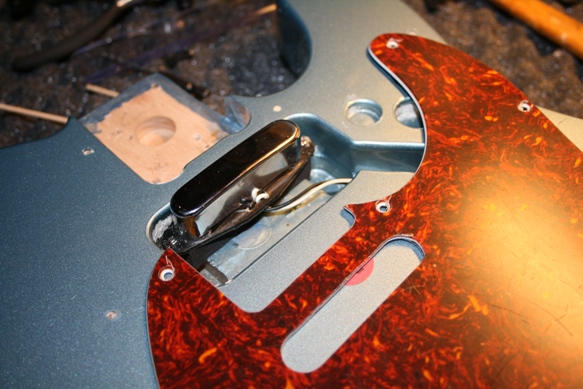
I really like the tortoise (of course fake) colour.
The one in the picture fits the body by sheer coincidence and looks great. This is the 8 screw type. Watch it there're also 5 screw PGs. This body is also of the 8 screw type. Luckily the neck position matches, however two of the screw holes dont match the pickguard. If the pickguard doesnt fit wel around the neck, you have some adjustment to do - get your Dremel tool out! Use your Dremel low rev, otherwise it will melt the material instead of cleanly removing it.
Satay sticks are of great value here during the fitting process as well as lateron to make litttle plugs to fill the unused screw holes. This is really necessary as some of the old holes are very close to where the new ones must come.
Don't try to skip the filling as screws tend to get a life of their own when another hole is very close - causing a lot of pulverized wood.
Pickup wiring scheme- aka electronics
Above is an example of a reasonably standard Tele wiring. This uses a 3-way switch, newer types on a little printed circuit board. Different types of switches are around, but the way they work is the same..
This is a very simple circuit. The 3-way switch acts indeed as a 3way switch as in the original Strats (modern strats have a modified 3way switch with 5 positions).
The switch will give neck, neck plus bridge, or bridge PU.
If you have a prewired control plate (see below) life is easy. Solder de signal leads to the switch as indicated, and solder de mass leads to the casing of the volume pot. Always useful to take your multimeter to check which switch position corresponds with which output pin. Then solder the connections such that it is logical when playing - i.e. the lever points to the neck for the neckpickup etc.
Solder the mass lead to the casing of the output jack and the output from the volume pot (=signal) to the tip. Thats it.
Consider to add some shielding and connect shielding to the casing of the vol pot.
Interesting: you can see in the circuit diagrams a permanent cap between input and output of the volume pot, this is a treble bypass and can account for some of the tonal properties of the Tele. The treble bypass will always pass a certain amount of higher frequencies, independent of volume. The control plate I purchased somhere only has the tone pot cap. You can do this treble bypass with Strats as well by the way. See below a fully wired controlplate - easy for the lazy luthier. In the section on electronics more about treble bypass and the like.
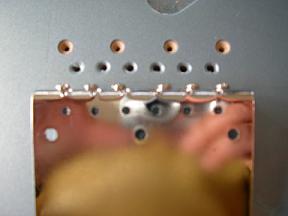
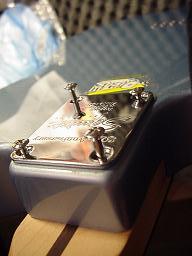
The vintage jack-cup and retainer plate
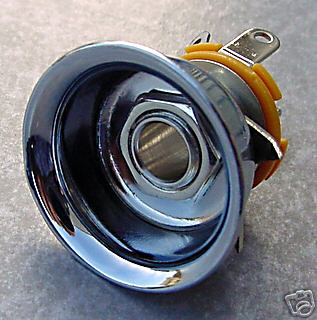
The vintage jack cup is interesting , it fits into the body with piece of sharp metal called the retainer clip (below).
Leo Fender figured that one out very cleverly - on the outside of the guitar you dont have a clue how the thing is held in place.
Installation may cause you a major headache and you may wish to order - I did - a special tool (StewMac). It should be possible to do something with a large bolt and a few nuts -but thats bound to be messy.

There are also newer cups that fit with two or four small screws - not as original though., and less neat. A lot easier though.
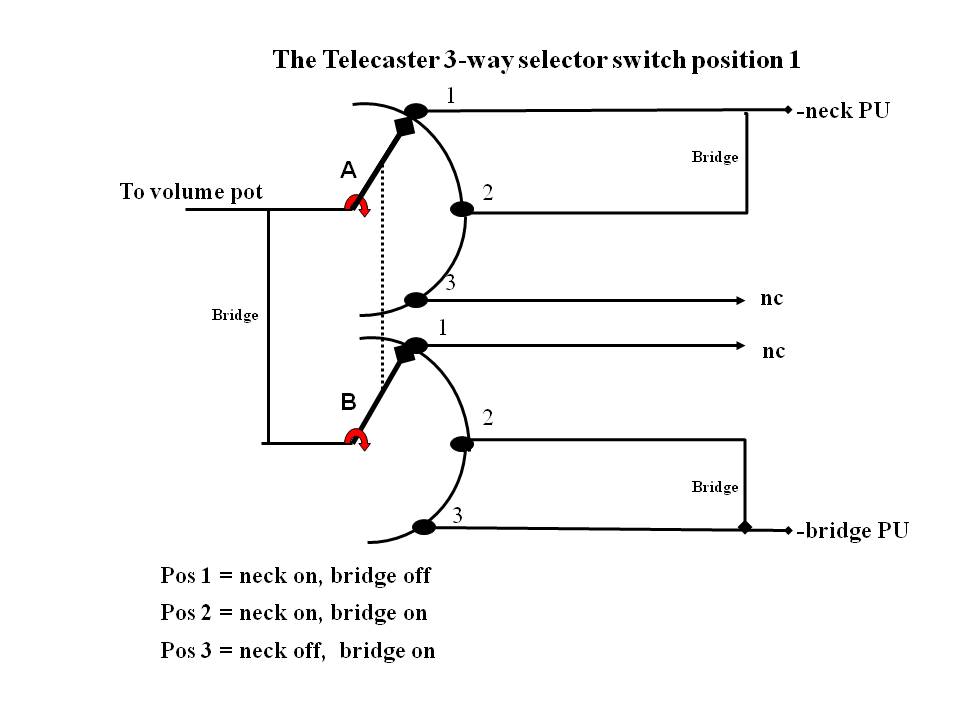
The Tele 3-way switch
It is well worthwhile to understand a bit how these switches (Strat and Tele) work, and how they must be connected if you must replace or modify something.
My book explains more about it, but here are some details as well as a picture that shows how the switch operates.
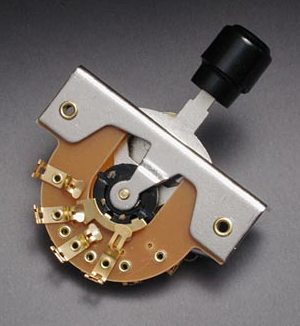
Basically this is a double rotary switch with three contacts in and one out. Shown is the vintage type lever switch, but more recent models are on a small PCB (printed circuit board) - operation is the same.
- The two switches are on one axle and thus operate in perfect unison.
- So we have two 3-way switches operating in parallel
- Each PU is connected to one switch, the two switchoutputs are bridged and go to the volume pot.
- The output goes to the volume/tone control potmeters (the Strat works quite differently, see the Stratpage)
Position 1 - Neck pup only. Imagine you move the pointers for example to the mid position (2) and see what happens.
Tuners, machines, whatever.
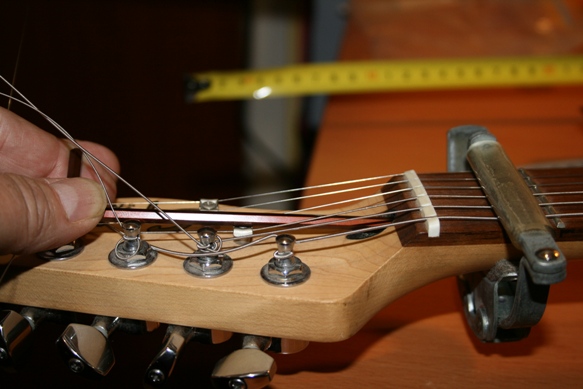
See photograph with a very vintage (1963 Musicmaster) example of slotted tuners with non-threaded bushings. By the way, the Musicmaster is 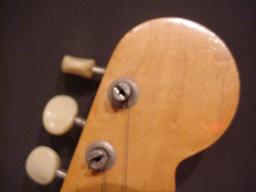 a wonderful guitar with a great sound from its single PU, and vintage still affordable - not for long though. However, the short scale was a bit to short for my big hands.
See the Precision Bass page how to set up strings in slotted tuners. The PBass pegs are larger, but the principle is the same
Tuners, machines, machine heads, pegs and more aliases are used. They come in a number of variations. With bushings that have to fit in the headstock, with threaded bushings that are screwed on the machine. Then there are vintage slotted tuners and new models with a hole thru the peg.
I prefer the Schaller type machines, that fit with two placeholding studs in the headstock, rather than the miserable tiny screws that many brands use.
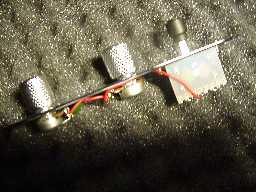
Control plate
All electronics (volume pot, tone pot and switch) are mounted on the control plate.
You can buy all components separately, or be lazy and buy a completely wired and soldered control plate like this one here.
If this is your first attempt, you can get ridiculously cheap at www.aliexpress.com , worth to have a look.
The neckplate
Holds the neck - body connection. Most common is the variant with 4 screws.
In the seventies Fender experimented some time with a 3-screw connection and a triangular neckplate, which did not become very popular. Recently (Anniversery models) there are neckplates with 4 screws but asymmetric. The Precision Lyte Bass models have a similar genetic quirk.
The regular 4-screw type fit Stratocaster, Telecaster and Precision Bass.
Vintage neckplates may hold a serial number - and will cost loads if genuine. Many fakes around. Serial numbers moved to the headstock lateron.
There is also a black plastic neckplate that fits under the metal one. Thats purely cosmetic, no function.
Neckplates for Strat, Tele and PBas are interchangeable. Exceptions are the seventies three point connections and the assymetric connections.
The rest
The Fender necks are fairly flat compared to for example a Gibson neck with a glued on headstock. Therefore the thinner strings on Fenders have too little pressure on the nut.
Stringguides or trees. Required for the E1 and B2 strings to force the correct angle of the string over the nut. Sometimes also for G3 and D4.
Strapholders. Useful if you want to play standing up., using a strap.
GUITARS RECYCLED - CONTACT
Use this link to send me a question or order the Telecaster book: